gluten free zen
Taking The Stress Out Of Gluten-Free Grain-Free & Dairy-Free Living
Cashew Coconut Milk Yogurt

Cashew Coconut Milk Yogurt
*Makes seven 6 ounce servings
1 Cup of Organic Unsalted Cashews, soaked in filtered water with a pinch of sea salt for 3 1/2 hours
3 Cups of Full Fat Coconut Milk, I use the Arroy-D brand
The Contents of 6 Probiotic Capsules, I used Dr. Mercola’s (make sure the probiotic you choose is just probiotics and doesn’t have other gut supplements added)
2 Tablespoons of Pure Maple Syrup
2 teaspoons of Gelatin, I used Vital Proteins Beef Gelatin (does not have a flavor) I would guess you can also use a plant based gelatin, but I have not tried it so results may vary
Drain the cashews and rinse. Pat dry with paper towels. Add all of the ingredients to a high powered blender (be sure to only use the probiotic powder, do not add the whole capsule). Blend until very smooth. Pour into your yogurt maker (I use this one). Leave the lids off and drape a clean kitchen towel over the top. Allow to heat for 8 hours. Secure the lids and refrigerate over night.
Chocolate Bombs


Chocolate Bombs
*Makes 15
15 Organic Medjool Dates
2/3 Cups of Organic Walnuts
2 Tablespoons of Organic Chia Seeds
1/2 teaspoon of Organic Ground Ginger
1/4 teaspoon of Celtic Sea Salt
2 Tablespoons of Organic Cacao Powder (lower to 1 Tbs if you’re sensitive to caffeine)
1 Tablespoon of Pure Maple Syrup
2 Bars of Theo’s Organic Sea Salt 70% Dark Chocolate
Measure all ingredients except the dark chocolate into a food processor. Pulse until the mixture comes together and will stay together when pressed with your fingers. There will be tiny pieces of walnuts, but make sure they aren’t too big or the balls won’t hold together when you form them.
Line a cookie sheet and press the mixture into 15 balls. Place in the freezer to set. Meanwhile, place a bowl over a pan of water (or use a double boiler if you have one) and melt the chocolate. Not too hot or it will seize! Once completely melted, remove the balls from the freezer, roll each one in the chocolate, let the excess run off, and place them back onto the cookie sheet. When all of the balls have been coated in chocolate, place them in the freezer again for 10 minutes. Remove from the freezer and using the remaining melting chocolate, drizzle over the top of the balls. Return to the freezer for 10 more minutes to set.
Store in an airtight container in the fridge (if they last that long!)
Grain Free Blueberry Yogurt Muffins
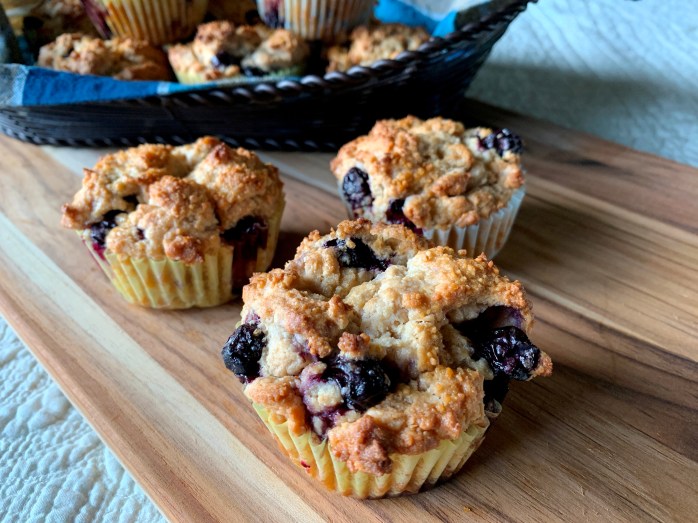
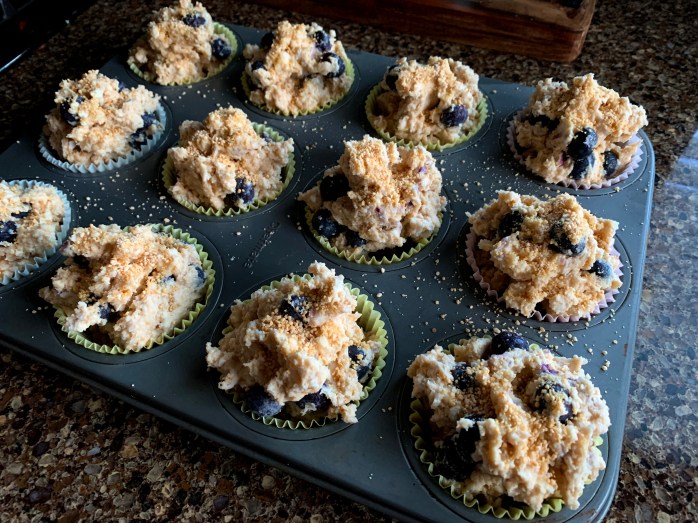
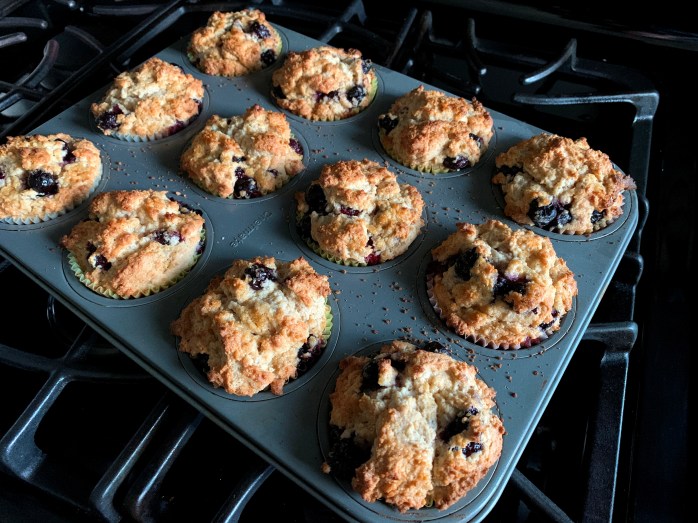

Grain Free Blueberry Yogurt Muffins
*Makes 12 Muffins
2 Cups of Cassava Flour
2 teaspoons of Double Acting Baking Powder
1 teaspoon of Xanthan Gum
1/2 teaspoon of Celtic Sea Salt
3/4 Cup of Pure Maple Sugar (if you use white sugar increase to 1 cup)
3/4 Cup of Miyoko’s Vegan Cultured Butter, cold and cubed (if you use Earth Balance, reduce the amount to 1/2 Cup)
1 Container of Trader Joe’s Vanilla Organic Cashew Yogurt
1 Egg
1 teaspoon of Pure Vanilla Extract, 2 if you use plain yogurt
1 Cup of Full Fat Coconut Milk
2 Cups of Organic Frozen Blueberries
Pure Maple Sugar for Sprinkling
Preheat oven to 375 degrees and line a 12 muffin tin with paper liners and set aside.
Whisk the flour, baking powder, xanthan, salt, and maple sugar. Cut in the butter until it resembles pea sized pieces. Whisk the vanilla and egg into the coconut milk. Add the coconut milk and yogurt to the flour mixture and gently fold until all of the dry ingredients are incorporated. Do not over mix. Next, add the blueberries and continue gently folding until they are dispersed.
Use the entire flour mixture for the 12 muffins. I spoon the batter into each muffin paper up to the edge, then go around again and top them of with another scoop. They will appear overfilled, but don’t worry, they bake perfectly! Next, sprinkle the tops of each muffin with a generous pinch of pure maple sugar.
Bake for 30 minutes or until they test done in the middle. I use convection for all of my baking, if you’re using a conventional oven, they may take 5 or so minutes longer to bake.
Mixed Berry Crumb Tart


Mixed Berry Crumb Tart
Preheat the oven 350 degrees and prepare a 9″ tart pan or pie pan with oil
For The Crust & Crumble:
1/2 Cup of Walnuts, finely chopped (or almonds or macadamia)
4 Tablespoons of Raw Pumpkin Seeds, finely chopped
2 Cups of Cassava Flour
1/2 Cup of Pure Maple Sugar
8 oz of Miyoko’s Vegan Cultured Butter, cold
For The Filling:
4 Cups of Frozen Mixed Berries (I used raspberries, blueberries, and blackberries)
1/2 Cup of Pure Maple Sugar
1 1/2 Tablespoons of Arrowroot
Allow the berries to thaw for 30 minutes, then toss with the sugar and arrowroot and set aside.
Whisk the nuts, seeds, flour, and sugar together in a medium bowl. Cube the butter and cut into the flour mixture until it resembles pea sized crumbs. With your fingers, evenly press half of the flour mixture into the bottom and sides of the tart or pie plate. Spoon the fruit filling into the pan (some of the sugar and arrowroot may be in the bottom of the bowl, if this happens, simply sprinkle it over the top of the fruit in the pan). Sprinkle the remaining flour mixture evenly over the berry mixture.
If you’re using a tart pan with a removable bottom, place the pan on a cookie sheet to catch butter and fruit drips. Bake (I use convection, so if you are using an conventional oven, time may vary a bit and take longer) at 350 degrees for 1 hour.
Cool completely before removing from the tart pan. Or, if you’re using a pie plate, you can also serve it warm. The addition of a scoop of dairy free vanilla ice cream would make it extra special!

Raspberry Cream Cheese Pastries


Raspberry Cream Cheese Pastries
*This recipe makes 8 pastries
For the bottom layer:
1 Cup of Mama’s Almond Blend All Purpose Gluten Free Flour
1/2 Cup of Miyokos Vegan Cultured Butter
1/4 teaspoon of Xanthan Gum
Pinch of Sea Salt
2 teaspoons of Pure Maple Sugar
3 Tablespoons of Cold Water
Preheat the oven to 350 degrees
Whisk the flour, xanthan gum, salt, and sugar. Cube the butter and with a pastry blender or fingers, quickly cut the butter into the flour mixture until the mix is crumbled and the butter is dispersed into small chunks. Stir the water in with a fork and with the back of the fork, work the the dough a bit to get it to come together. Don’t over work it! Form the dough (lightly) into a ball and slice into 8 sections. Line a baking sheet with parchment. Roll (lightly) all 8 dough pieces into a ball, and with floured fingers, pat them out into about 4 inch circles. I added fork marks to the edges of mine for aesthetic reasons, but it is not necessary. Set aside.
For the Cream Cheese Filling:
1 – 8 ounce Container of Plain Kite Hill Almond Milk Cream Cheese
1 1/2 teaspoons of Grated Lemon Peel
2 teaspoons of Lemon Juice
1/2 teaspoon of Pure Almond Extract
1/2 teaspoon of Pure Vanilla Extract
2 teaspoons of Pure Maple Sugar
Beat until smooth and refrigerate until ready to use.
For the Top Pastry Layer:
1 Cup of Water
1 Cup of Mama’s Almond Blend All Purpose Gluten Free Flour
1/2 Cup of Miyoko’s Vegan Cultured Butter
1/8 teaspoon of Xanthan Gum
2 teaspoons of Pure Maple Sugar
Pinch of Sea Salt
3 Large Eggs – room temperature!
1/2 teaspoon of Pure Almond Extract
Raspberry Jelly
Whisk the flour, xanthan gum, sugar, and sea salt, set aside. Warm the water, add the butter, bring to a boil. Remove from the heat as soon as it boils. Add the flour mixture and whisk until smooth. It will begin to stick together, don’t panic! With a wooden spoon, beat in one egg at a time. At first, it will separate, just keep beating and it will come together after each egg. Once all of the eggs have been incorporated, add the almond extract and beat with the wooden spoon to combine. Spoon the pastry mix over each of the rounds on the baking sheet. It will be sticky, spread it with a metal spoon. Make a small well in the center of each.
Remove the cream cheese mixture from the fridge and dollop about 1-2 Tablespoons in the middle of each well.
Bake for 30 minutes. (I use convection for all of my baking. A conventional oven may take a bit longer. You want the pastries to be lightly golden.) Remove from the oven and let sit for 10 minutes. Remove to a cooling rack to cool completely.
Once the pastries have completely cooled, dollop the top of each with the raspberry jelly. About a 2-3 teaspoons. Not so much that it takes over the top of the pastry!
For The Frosting Drizzle:
About 3 Cups of Powdered Sugar
About 1 Tablespoon of Melted Vegan Butter
About 2 – 3 teaspoons of Water to thin
I say “about” because with powdered sugar frosting, the consistency and amounts can vary greatly. If it’s not thin enough to drizzle (but you don’t want it too thin of a drizzle either!) then add a tiny bit more water at a time until you reach the consistency you like. If it’s too thin, add a Tablespoon of powdered sugar at a time until you like the looks of it. It’s really that simple.

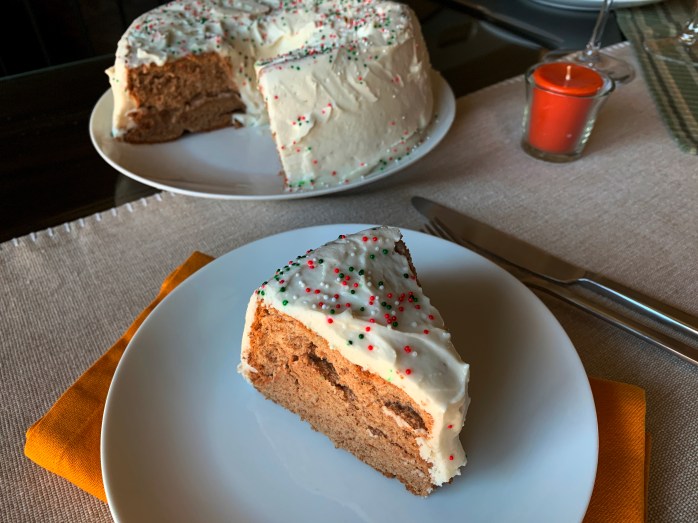
Angel Food Spice Cake
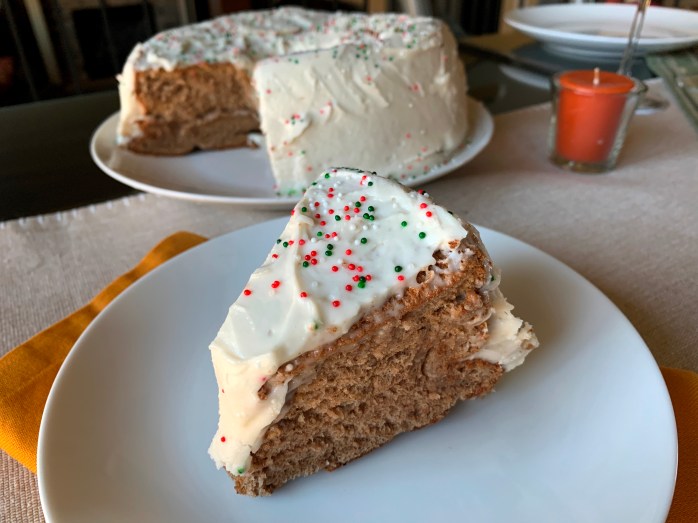
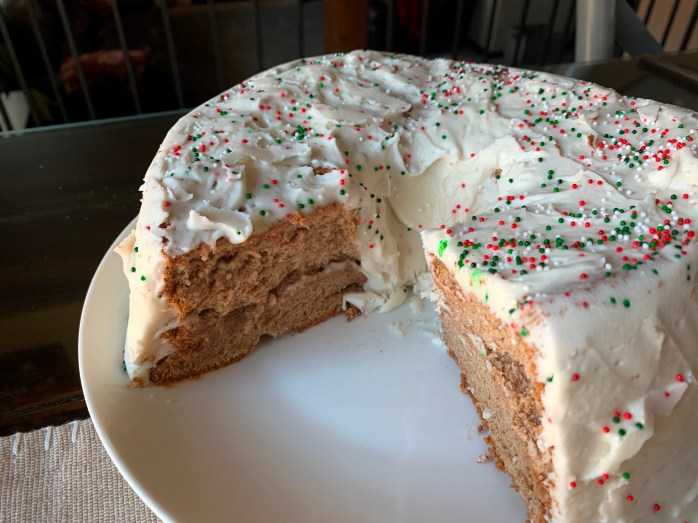
You can head over to Back Porch Paleo for her Paleo Angel Food Cake recipe. Follow her recipe and then simply add these spices to the dry ingredients:
3 teaspoons of Ceylon Cinnamon
1 3/4 teaspoons of Nutmeg
1 1/4 teaspoons of Ginger
1/2 teaspoon of Allspice
1/2 tsp of Cloves
For the frosting, I made a basic cream cheese base with a bit of vegan butter, vegan cream cheese, powdered sugar, pure almond extract, pure vanilla extract, and a squeeze of fresh lemon juice. If you need to, you can use a tiny bit of coconut milk to thin it to spreading consistency. If you use the vegan butter and vegan cream cheese, the cake will need to stay chilled.
Peanut Butter Chocolate Chunk Granola
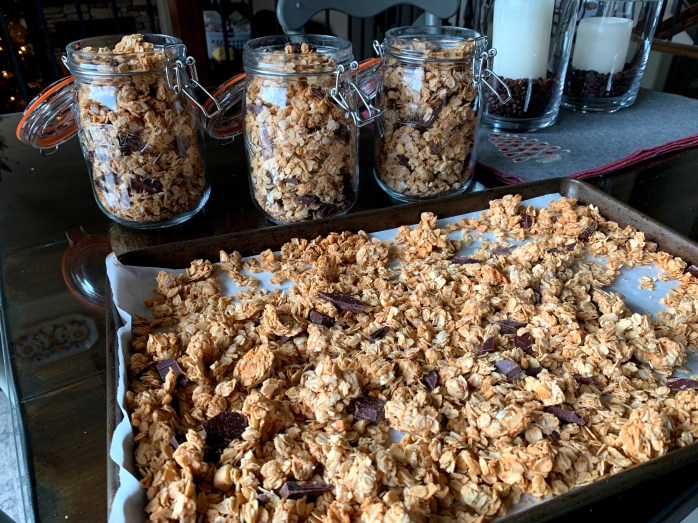


Peanut Butter Chocolate Chunk Granola
*This recipe will fill four 34oz mason jars*
1 2 lb Bag of Gluten Free Rolled Oats
2 Cups of Roughly Chopped Raw Unsalted Cashews
Pinch (generous) of Celtic Sea Salt
1/2 Cup of Organic Unrefined Virgin Coconut Oil, melted
3/4 Cup of Pure Maple Syrup
1 16 oz Jar of Organic No Stir Crunchy Peanut Butter
2 Bars of Theo’s Organic 70% Dark Chocolate, roughly chopped
Preheat oven to 325 degrees. You will need 2 large bowls but will start with one. Measure the oats, cashews, and sea salt, and stir to combine. Add the coconut oil and syrup and fold and stir until all of the oat mixture is coated.
Scoop half of the oat mixture into the other large bowl. Scoop 1/2 of the peanut butter into each bowl. With a wooden spoon, work the peanut butter into the granola by kind of pressing it down a bit, twisting the wooden spoon, and folding. It will come together eventually and spread out nicely. You want it to be a little chunky, but not big blobs of peanut butter.
Line two cookie sheets with parchment or silpat and pour the oats onto the sheets. Spread the oat mixture out as evenly as possible and bake for about 25 minutes or until it just starts to turn golden. The granola will firm upon cooling.
Roughly chop the chocolate while the granola is cooling. Once the granola is completely cooled, add the chocolate chunks.
Store in airtight containers.
Buckwheat Wraps
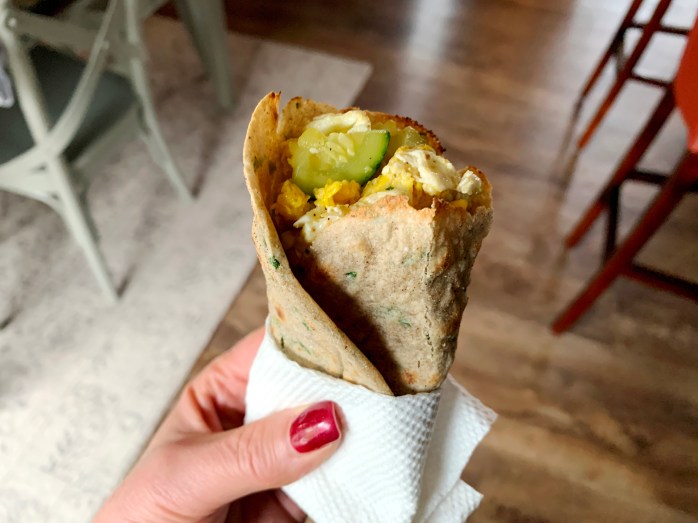


If you enjoy these wraps, I also have a recipe for Grain Free Spinach Tortillas
On this day, I used the tortillas for breakfast wraps. Just a simple breakfast of scrambled eggs and fresh zucchini. All of my tortillas/wraps are extremely versatile! You can add all kinds of flavors and fill them with whatever you love.

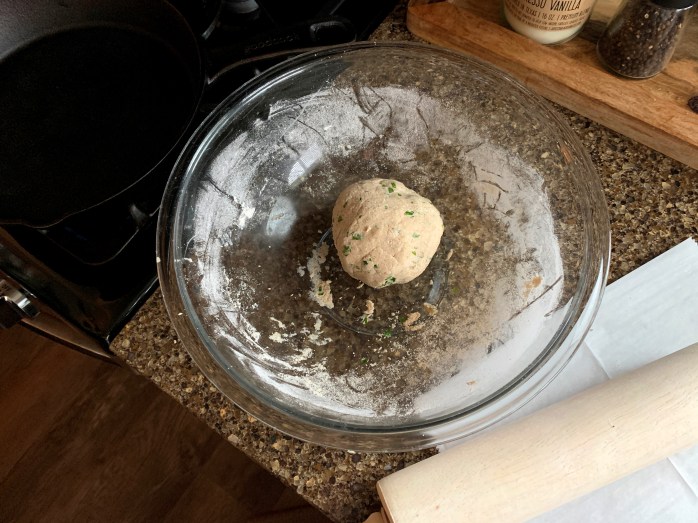
Buckwheat Wraps
*egg free *dairy free *gluten free *grain free (buckwheat is not a grain) *sugar free
1 Cup of Ground Organic Raw Hulled Buckwheat Groats (I grind mine in the blender)
1/4 Cup of Otto’s Cassava Flour
3/4 teaspoon of Celtic Sea Salt
3/4 teaspoon of Organic Garlic Powder
1/4 Cup of Chopped Organic Parsley
2 Tablespoons of Organic Extra Virgin Olive Oil
About 1/2 Cup of Water (more or less depending on texture)
Grind the groats in a blender until they resemble flour, it will still be a bit grainy. Whisk the flours, sea salt, garlic powder, chopped parsley. Add the olive oil, and 1/4 cup of the water. Mix with a fork until it starts to come together, add more water as needed until it comes together enough to knead. Knead until completely smooth. Cover with a damp paper towel and set aside.
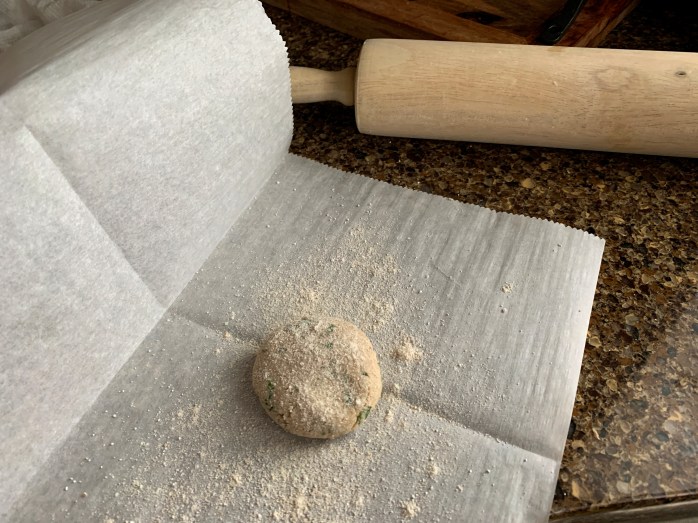
Heat a medium cast iron skillet (or any skillet you have) on medium high (no oil). Cut two pieces of parchment paper (for rolling the tortillas). Split the dough into 8 somewhat equal pieces, form into balls, and place one at a time in the middle of a sheet of parchment. Press down the dough ball with your palm to form a flattened circle then cover the top with another piece of parchment and roll out into a thin circle. Continue with the remaining dough. If they begin to stick, sprinkle the paper with a little groat flour or cassava flour. I also cover the waiting dough balls with a damp paper towel.
When the pan is hot, loosen the paper from the top of the tortilla and flip the tortilla off of the bottom sheet into the pan. When it begins to bubble, lift the edge and check to see if it is slightly browned on the underside. It should also slide pretty easily in the hot pan when it is ready to flip. **DO NOT use a plastic spatula to flip the tortillas because it will melt and leave streaks of plastic in your pan. Use a flat wooden spatula or you can also slide a butter knife under the tortilla and hold the top with your other hand to flip it. Remove the cooked tortillas to a cooling rack to cool or tortilla holder if you’re serving them immediately and repeat the process with the remaining tortillas.

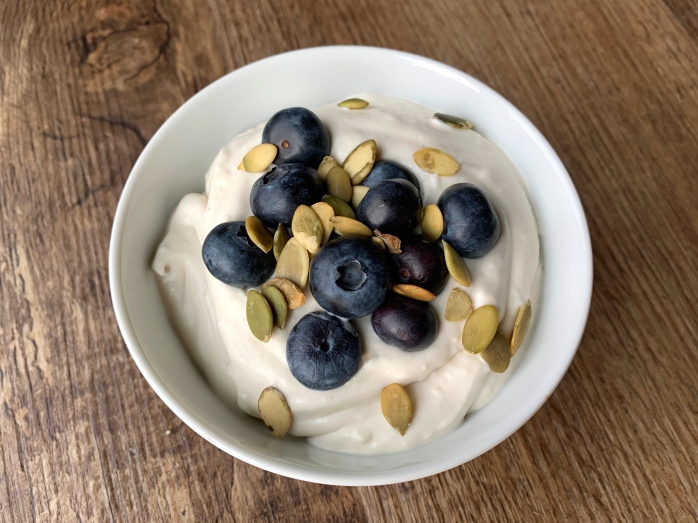
Raw Berry Bars


Raw Berry Bars
For The Crust:
2 Cups of Extra Thick Organic Gluten Free Rolled Oats
1/4 Cup of Raw Organic Pumpkin Seeds
1/4 Heaping Cup of Organic Walnuts Halves
16 Pitted Organic Medjool Dates
3 Tablespoons of Organic Unrefined Coconut Oil, melted
1 teaspoon of Pure Vanilla Extract
1 Tablespoon of Pure Maple Syrup
1/2 teaspoon of Celtic Sea Salt
For The Filling:
1 1/2 Cups of Soaked Organic Cashews (rinse and soak in filtered water with a pinch of sea salt for a minimum of 4 hours or over night)
1/2 Cup of Organic Frozen Berry Mix (I used Simple Truth Organic Cherry Berry), thawed & drained
1 5.3 oz Container of Kite Hill Vanilla Almond Milk Yogurt
2 teaspoons of Fresh Organic Lemon Zest
2 Tablespoons of Fresh Organic Lemon Juice
1/2 Cup of Full Fat Coconut Milk (my favorite brand is ArroyD)
1/3 Cup of Organic Unrefined Coconut Oil, melted and cooled to the touch
1 Tablespoon of Raw Honey (Vegans can use pure maple syrup)
Directions For The Crust:
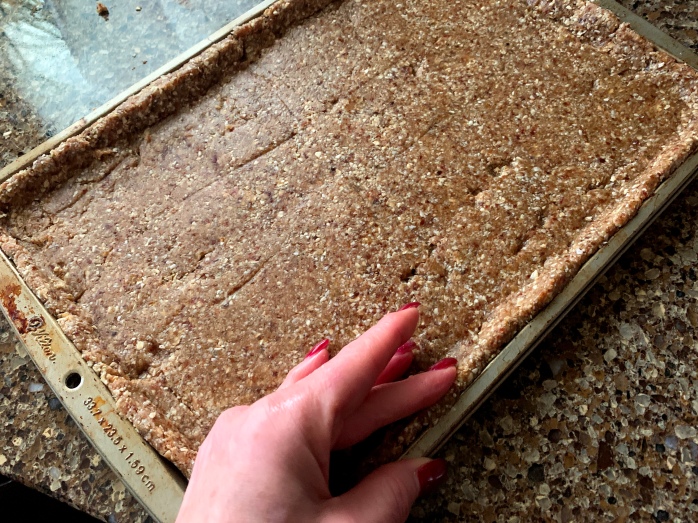
Add the oats, seeds, nuts, to food processor. Pulse for about 20 seconds to finely chop, but not enough that it turns into flour. Add the dates and pulse a few times. Add the coconut oil, vanilla, maple syrup, and sea salt and pulse until it forms a paste and comes together. Line an 11 x 16.5 baking sheet with parchment, and spray lightly with nonstick spray (I use organic avocado oil spray). Scoop the crust mixture onto the tray and press out with fingers until flattened. Then, using an 8 oz drinking glass, press and roll the crust until it is uniform and has a nice edge up the sides of the pan. Smooth the edges with your fingers and place the pan in the freezer to set.
Directions For The Filling:
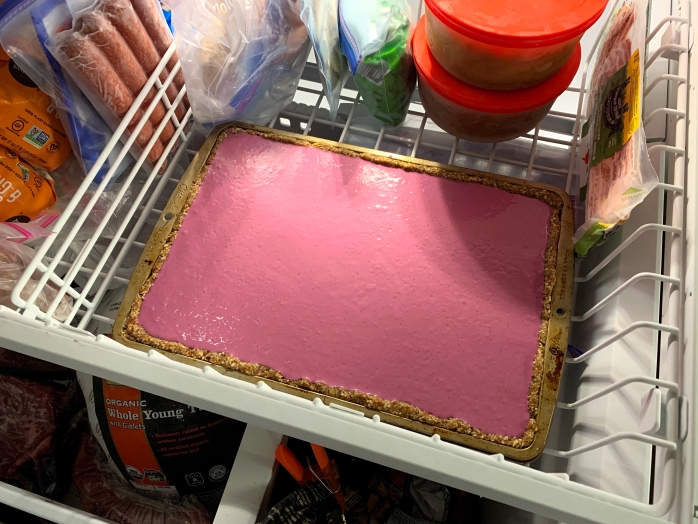
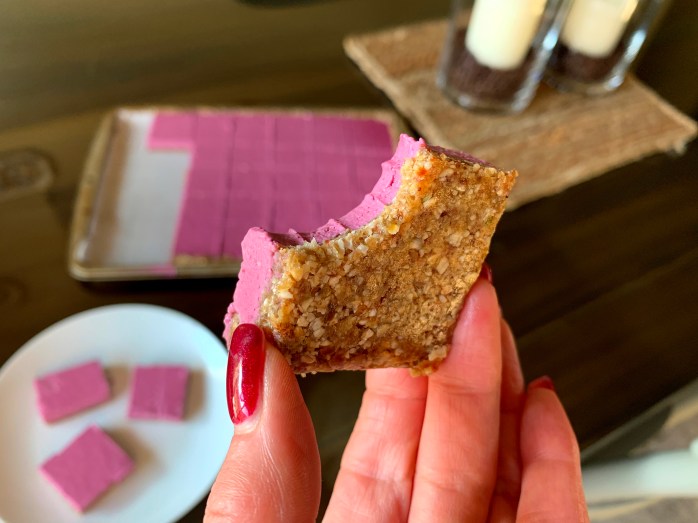
Rinse the cashews that have been soaking and add them to a high powered blender. Add the thawed berries, the yogurt, lemon zest, lemon juice, coconut milk, coconut oil, and raw honey. Blend until completely smooth. Be mindful if you’re using a Vitamix or a Blendtec because if you blend them on high for too long, it will begin to heat the filling. You don’t want that! Remove the crust from the freezer, pour filling over the crust and smooth. Tap the tray on the counter a few times to remove any air bubbles and return to the freezer. Freeze completely, remove from the freezer and cut into squares. You can store them in an airtight container in the fridge for about 3 days (do not stack them on top of each other), or in the freezer and they will last two weeks (if you can stay away from them that long). They are delicious frozen too!
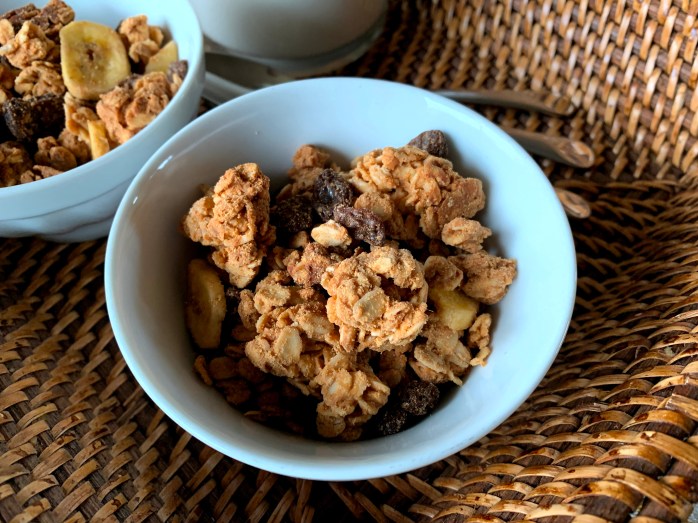
Banana & Raisin Granola
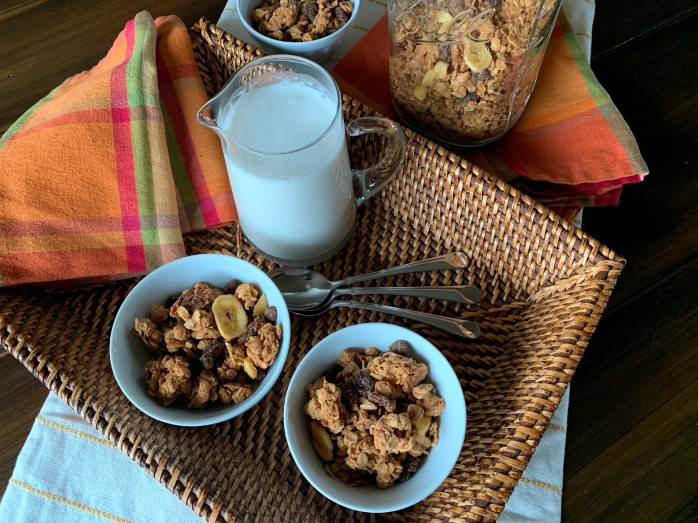
Banana & Raisin Granola
3 Cups of Gluten Free Organic Extra Thick Rolled Oats
1 1/4 Cups of Organic No Stir Crunchy Peanut Butter
3 Tablespoons of Coconut Oil, melted
1/4 Cup of Pure Maple Syrup
3/4 teaspoon of Celtic Sea Salt
1 Cup of Organic Dried Banana Chips, broken up a bit
1 1/4 Cups of Organic Raisins
1/2 teaspoon of Ceylon Cinnamon
1 1/2 teaspoons of Organic Coconut Sugar
*Preheat oven to 350 degrees and line a baking sheet with parchment or silpat
Stir the oats, peanut butter, coconut oil, maple syrup, and sea salt with a spatula until combined. Some chunky peanut butter bits stuck together are OK and preferable. Spread the oat mixture onto the baking sheet and bake for 20-30 minutes turning the pan halfway in between until the oats are lightly golden. ***Cooking time will vary depending on your oven. Don’t over bake, the granola will firm up and crisp upon cooling.
While the granola is baking, measure the banana chips, raisins, cinnamon, and coconut sugar into a medium bowl and toss with a spoon until the banana chips and raisins are lightly dusted with the cinnamon and sugar.
Remove the granola from the oven and cool for 10 minutes on the pan. Then, slide the granola off of the pan with the parchment onto the counter to cool completely. Toss the granola carefully with the raisin mixture and store in an airtight container.