gluten free zen
Taking The Stress Out Of Gluten-Free Grain-Free & Dairy-Free Living
Grain Free & Vegan Banana Double Chocolate Muffins


Banana Double Chocolate Muffins
1 1/8 Cups of Very Ripe Mashed Banana
2 Tablespoons of Avocado Oil
2 teaspoons of Vanilla
4 Tablespoons of Full Fat Coconut Milk
1/2 Cup of Coconut Sugar
1/3 Cup of Cacao Powder
1/2 Cup of Arrowroot
1/2 Cup of Coconut Flour
1 teaspoon of Double Acting Baking Powder
1 teaspoon of Baking Soda
1/8 teaspoon of Celtic Sea Salt
1/2 Cup of Enjoy Life Mini Chocolate Chips
Preheat oven to 350 degrees. Line 12 muffin cups. Measure all of the ingredients except the chocolate chips into a medium bowl and fold together until combined. Fold in the chocolate chips. Fill each muffin cup almost to the top and bake (I use convection) for 20 minutes, until mostly firm in the middle when touched with a finger.

Grain Free & Vegan Huckleberry Scones
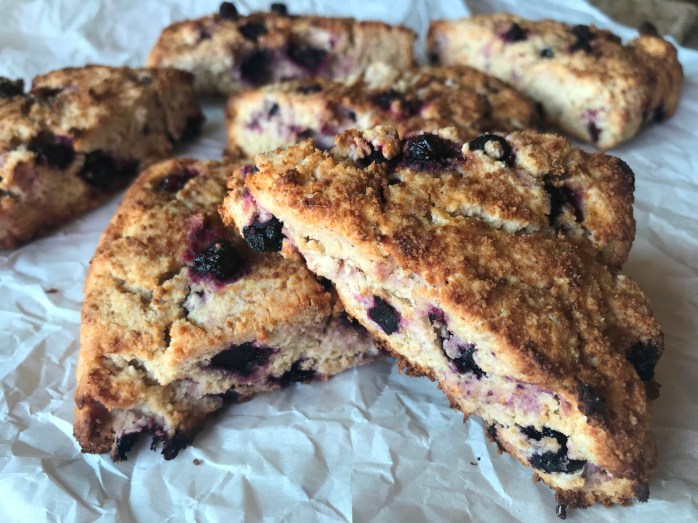

Huckleberry Scones
*Makes 8 Triangles OR You Can Use Smaller Biscuit Cutters for More Servings
Preheat oven to 400 degrees
1/2 Cup of Coconut Flour
1/4 Cup of Chestnut Flour
1/4 Cup of Cassava Flour
2 1/2 teaspoons of Double Acting Baking Powder
1/4 teaspoon of Celtic Sea Salt
2 Tablespoons of Coconut Sugar (plus extra for sprinkling)
Zest of 2 Medium Lemons
6 Tablespoons of Dairy Free Butter (I use soy free Earth Balance)
3/4 Cup of Full Fat Coconut Milk (my favorite is the Arroy D brand)
1/4 Cup of Fresh Lemon Juice
2 teaspoons of Pure Vanilla Extract
3/4 Cup of Fresh or Frozen Huckleberries
Whisk the dry ingredients together and set aside. In a glass measuring cup add the coconut milk, lemon juice, and vanilla. Stir and let rest while you cover a baking sheet with parchment or silpat.
Add the cold dairy free butter to the dry ingredients and cut in with two knives or your fingers (that’s what I prefer) until the mixture has small chunks of butter throughout about the size of peas.
Add the wet ingredients and the huckleberries and fold it all together gently, don’t overwork the dough or your scones will be dense and heavy.
Scoop the dough onto the covered baking sheet and pat lightly into a circle. You want to pat enough that the dough holds together after baked, but not so much that you pat all of the fluff out and make them heavy.
Slice into 8 wedges and separate. Sprinkle with extra coconut sugar.
Bake (I use convection) for 20-23 minutes. Cool on the baking sheet before removing and store in a loosely covered container. Will keep for 2 days or you can wrap them well and freeze them.
Carrot Cake Pancakes with Cinnamon Syrup


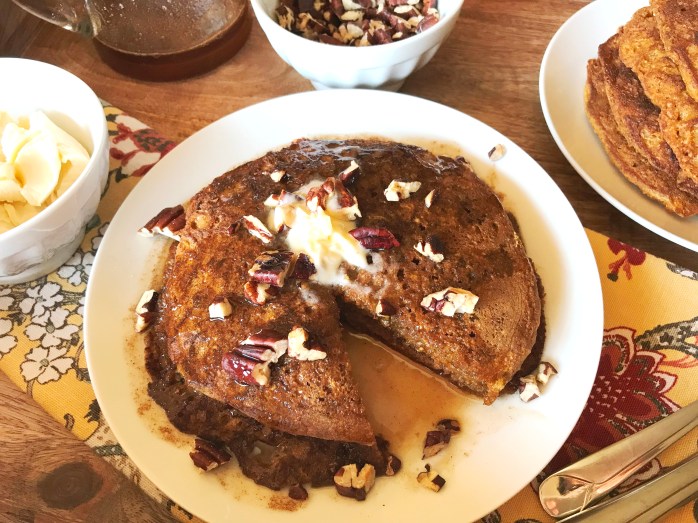

Carrot Cake Pancakes with Cinnamon Syrup
1/4 Cup of Chopped Toasted Pecans
1/2 Cup of Buckwheat Groat Flour (ground buckwheat groats)
1/4 Cup of Coconut Flour
1/2 Cup of Arrowroot
2 teaspoons of Double Acting Baking Powder
1 teaspoon of Baking Soda
1 1/2 teaspoons of Ceylon Cinnamon
1/2 teaspoon of Sea Salt
1/4 teaspoon of Ground Nutmeg
1/8 teaspoon of Ground Ginger
1/8 teaspoon of Ground Cloves
1/4 Cup of Coconut Sugar
1/2 Cup of Full Fat Coconut Milk
1/2 Cup Water
1 Tablespoon of Fresh Lemon Juice
1 Tablespoon of Avocado Oil
2 teaspoons of Pure Vanilla Extract
2 Eggs
2 Cups of Finely (or medium) Grated Carrots
Pure Maple Syrup
Dairy Free Butter
Ceylon Cinnamon
(For the cinnamon syrup: Simply add however much syrup you think you’ll need to a bowl, add about 1/2 – 1 teaspoon of cinnamon and whisk to combine. When pancakes are done, heat the syrup, whisk again, and serve with the pancakes.)
Whisk dry ingredients together. Whisk coconut milk, water, and lemon and let sit for 10 minutes. Add the oil, vanilla, and eggs, and whisk until frothy. Add to the dry ingredients and mix until combined. Fold in carrots.
Heat and butter a skillet. Cook pancakes until bubbles form on top and the underside is golden. Flip and cook for about 2 more minutes until done.
Serve with dairy free butter (or regular) and cinnamon syrup above.
Flourless Chocolate Dream Cake


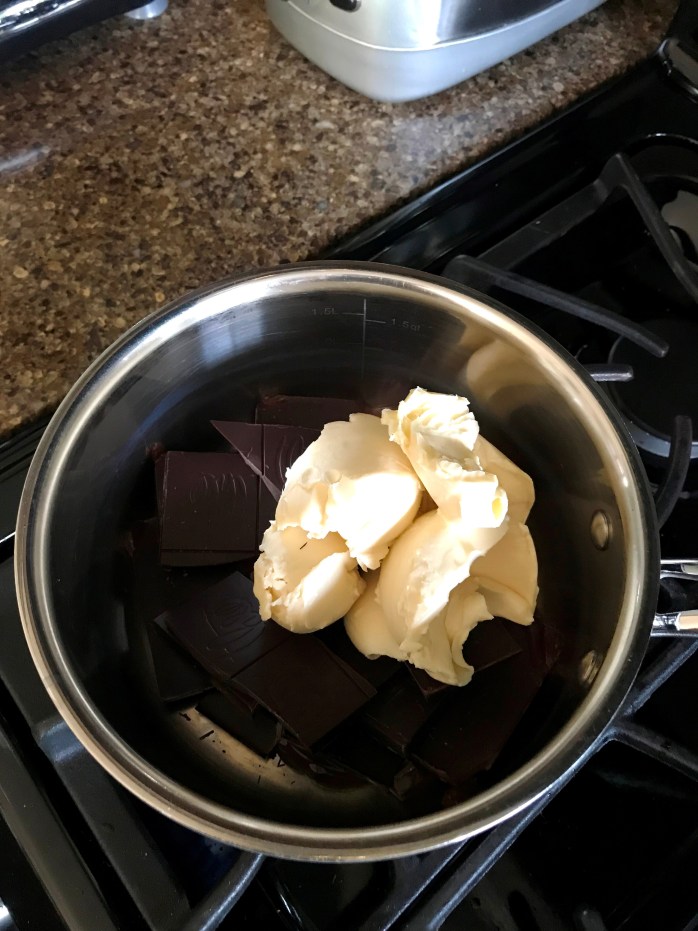


Flourless Chocolate Dream Cake
*12 Servings
For The Raspberry Sauce:
4 Cups of Frozen Organic Raspberries
2/3 Cup Organic Coconut Sugar
For The Cake:
4 Bars (12oz) of Theo’s Organic Fair Trade Pure 70% Dark Chocolate
7 ounces of Earth Balance Soy Free Dairy Free Butter (I no longer use this product and have moved to Miyoko’s Dairy Free Butter)
6 Organic Eggs
6 Tablespoons of Arroy-D Coconut Milk (full fat)
2 teaspoons of Pure Vanilla Extract
1 Tablespoon of Organic Coconut Sugar
For The Ice Cream:
I like to serve mine with Coconut Bliss’s Dairy Free Vanilla Island ice cream for those that cannot do dairy and with Tillamook Vanilla Bean ice cream for those that can tolerate dairy.
For the sauce add the Raspberries and 2/3 cup coconut sugar to a medium saucepan and heat on medium low. Once the raspberries are melted, turn to simmer for 45 minutes to an hour or until lightly reduced and thickened. Refrigerate for 3 hours. This can easily be made a day ahead and thickens more upon cooling.
Line the bottom of a 9 inch removable bottom tart pan with parchment and spray with non stick spray. (I spray the underside of the parchment as well.) Set the tart pan on a baking sheet and set aside.
Preheat the oven to 325 degrees.
For the cake add the dairy free butter and broken up chocolate to a medium saucepan. Heat on low to medium low being VERY mindful that it doesn’t get too hot and seize the chocolate. Stir as it begins to melt and once the mixture is smooth and incorporated, remove from heat.
In a medium bowl whisk the eggs, coconut milk, vanilla, and the 1 Tablespoon of coconut sugar until thoroughly incorporated and frothy.
Very slowly drizzle the egg mixture into the chocolate mixture whisking quickly. Don’t add the egg mixture too quickly, or the eggs will cook. You want to temper the chocolate first. When you’ve added about half of the egg mixture slowly – then you can pour in the remaining and whisk thoroughly.
Pour the chocolate mixture into the tart pan and bake for 24 minutes. There should be a little jiggle in the middle. The sides may also puff up while baking, but once it’s removed from the oven and begins to cool the cake will settle.

Grain Free Pesto Chicken Flatbread

These are Oh. SO. Good.


Grain Free Pesto Chicken Flatbread
*Makes 8 Flatbreads
1 Package of Boneless Skinless Chicken Tenders
2 Tablespoons of Avocado Oil
1 1/2 Tablespoons of Italian Seasoning Herbs
1 teaspoon of Garlic Powder
1/2 teaspoon of Sea Salt
Few Grinds of Fresh Pepper
1 Package of Chebe Focaccia Mix
1 Egg
1/4 Cup of Avocado Oil
1/2 Cup of Water
8 Tablespoons of Vegan Pesto
1 teaspoon of Sea Salt
16 Cherry Tomatoes, sliced in half
1/2 of a Small Onion, thinly sliced
1 Cup of Chopped Baby Spinach
2 Cups of Goat Gouda Cheese
2 teaspoons of Italian Seasoning Herbs
1/4 Cup of Freshly Chopped Oregano
1/4 Cup of Freshly Chopped Basil
Marinara Sauce
Heat the 2 TBS of avocado oil in a medium skillet. Place thawed chicken in the skillet and sprinkle both sides with the Italian Seasoning, garlic powder, sea salt, and pepper. Saute until done and set aside to cool. When cool, chop chicken, set aside.
Preheat oven to 375 degrees.
Line three baking sheets with parchment and set aside. Combine the Chebe Focaccia Mix, egg, 1/4 cup of avocado oil, and 1/2 cup of water and knead until smooth and dough is easily formed into a ball. You may need to flour hands (I use arrowroot). Cut the dough into 8 equal parts and pat out into rounds on the parchment covered baking sheets. Prebake the flatbread rounds for 10 minutes and remove from oven.
Heat the marinara in a small sauce pan and simmer on low until you’re ready to serve the flatbread.
Spread a TBS (or more if you like) of the vegan pesto on each round. Using 1 teaspoon of Sea Salt, sprinkle each. Top with the chopped spinach, onions, chicken, and 4 tomato halves each. Top each flatbread with the cheese. Sprinkle with the Italian Seasoning. Bake for 12 minutes or until cheese is melted and lightly bubbling on the edges. Remove from oven and sprinkle with the chopped fresh basil and oregano.
They also freeze well. I wrap mine individually with saran wrap and then store in a double bagged ziplock. To reheat, remove from plastic and thaw on counter. Preheat oven to 350 degrees. Place flatbreads on a parchment covered baking sheet and heat for 10-15 minutes.
Sunday Cinnamon Rolls
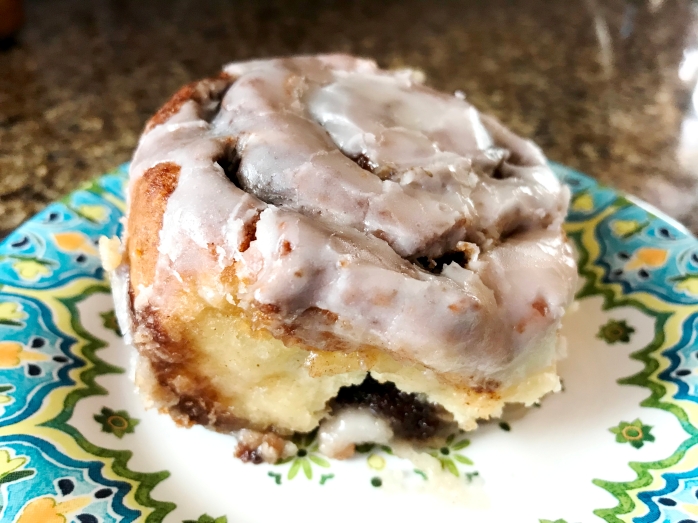


Gluten Free & Dairy Free Cinnamon Rolls
*Makes 12
For The Dough:
4 Cups of Mama’s Almond Blend Flour (plus more flour for rolling)
4 teaspoons of Xanthan Gum
4 teaspoons of Double Acting Baking Powder
2 teaspoons of Baking Soda
1 1/4 teaspoons of Sea Salt
1 3/4 Tablespoons of SAF Instant Yeast
6 Tablespoons of Earth Balance Soy Free Dairy Free Butter ( I now use Miyoko’s Dairy Free Butter)
1/2 Cup Sugar (I used granulated white sugar but you can use coconut sugar – it will change the color of the rolls)
1 Cup of Full Fat Coconut Milk (I use Arroy-D)
1/2 Cup of Avocado Oil
2 teaspoons of Pure Vanilla Extract
2 Eggs
Whisk the dry ingredients together in a bowl and set aside. In a stand mixer, cream the butter and sugar. Scrape down the bowl and add the coconut milk, oil, vanilla, and eggs. Mix on medium until incorporated. It make look a little curdled, that is OK. Add the dry ingredients and mix on medium for about 1 minute until fully incorporated.
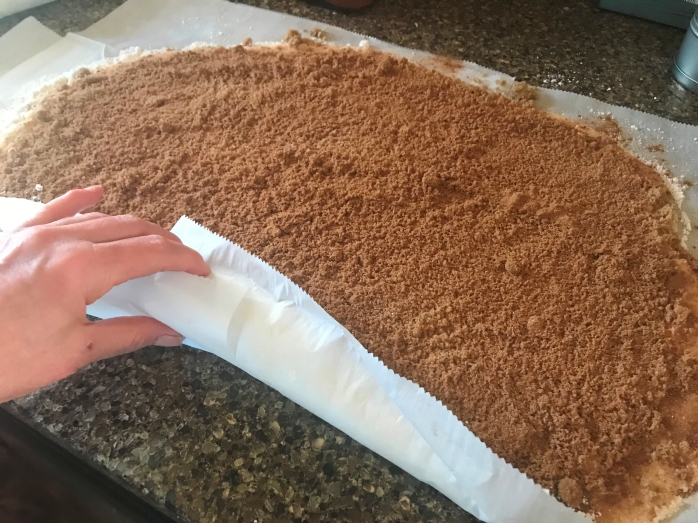
Place a large sheet (or multiple sheets if you use the pre cut sheets – I use 4) of parchment on the counter and sprinkle with flour. Turn the dough out onto the floured parchment and pat lightly into a rectangle. Flour the top of the dough and your rolling pin and roll out to about a 25×17 (approximately) rectangle. Top with filling below.
For The Filling:
1/2 Cup of Earth Balance Soy Free Dairy Free Butter (mash with fork to soften)
1 1/2 Cups of Dark Brown Sugar
2 3/4 Tablespoons of Ceylon Cinnamon
Couple Pinches of Sea Salt
Gently spread the softened but not melted butter across the entire top of the dough with the back of a large soup or serving spoon being careful not to tear the dough. (Once you soften it with a fork, it will be easy to spread with the back of a spoon) Sprinkle the brown sugar all over the top, spreading it out with your hand. Evenly sprinkle the cinnamon across the top and then sprinkle with the sea salt.
Take the edge of the parchment closest to you and use it to roll up the edge of the dough. Continue rolling the dough using the parchment (but don’t allow the parchment to roll up into the dough!) until you have one large log. Pinch the ends of the dough shut and carefully go down the log squeezing it and making sure it’s uniform and the end edge is pinched or at least flat up against the rest of the dough.
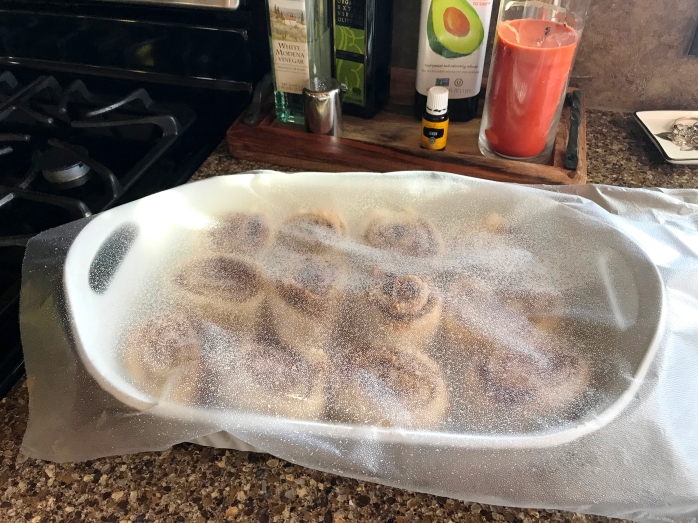
Coat a 9×13 inch pan with non-stick spray. Slice the rolls (starting in the middle) into 12 somewhat even pieces. Place them in the treated pan and top each one with a little (about 1/4 teaspoon) dollop of dairy free butter.
Set the oven to 350 degrees.
Spray a piece of plastic wrap and lay the sprayed side lightly over the top of the rolls. Cover with a light towel and set the rolls on top of the stove to rest for 45 minutes.
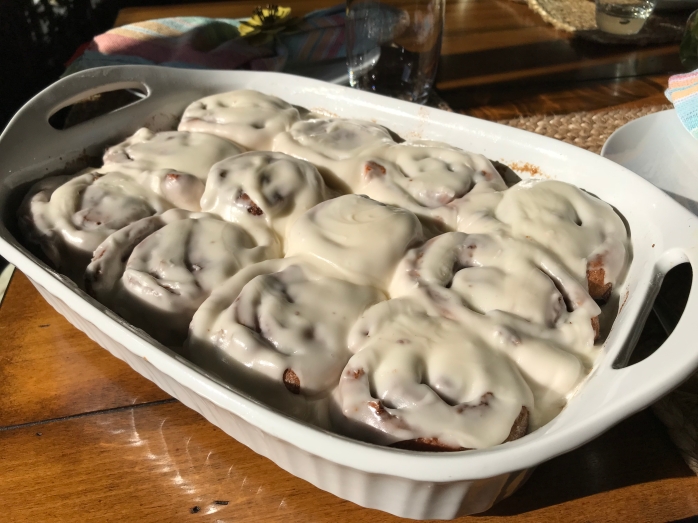
Remove the towel and plastic wrap. Don’t panic if they don’t look like they have risen, they will rise in the oven. Place on the middle rack and bake (I use convection) for about 35 minutes. Remove from the oven and cool on a wire rack for 30 minutes.
For The Frosting:
5 Cups of Powdered Sugar
1/2 Cup of Earth Balance Soy Free Dairy Free Butter
3 1/2 Tablespoons of Pure Almond Extract
A Little Water for Spreading Consistency
This is just your typical powdered sugar frosting but flavored with almond extract rather than vanilla, very easy! Melt the butter and add it and the almond extract to the powdered sugar. Whisk to combine and add a little amount of water at a time (2 Tablespoons at a time) until the frosting whips smooth but spreadable and not too thin.
Top the rolls with the frosting. Let set for 30 minutes. You can serve them right away or they will stay fresh and delicious on the counter very lightly covered for up to 24 hours.
Oatmeal Raisin Cookies


Gluten Free & Dairy Free Oatmeal Raisin Cookies
Makes About 15 Cookies
1 Cup of Mama’s Almond Blend Flour
1 1/2 teaspoons of Ceylon Cinnamon
1/2 teaspoon of Baking Soda
3/4 teaspoon of Sea Salt
1/2 teaspoon of Xanthan Gum
1 1/2 Cups of Bob’s Redmill Organic Gluten Free Rolled Oats
3/4 Cup of Organic Coconut Sugar
1/2 Cup of Earth Balance Soy Free Dairy Free Butter
1 Organic Egg
2 teaspoons of Pure Vanilla Extract
1 Cup of Organic Raisins
Add dry ingredients (except raisins) to a medium bowl and whisk to combine – set aside. In a stand mixer, cream the sugar and butter (about 2 minutes). Scrape down sides and add the egg and vanilla. Beat on medium until fully incorporated and creamy. Scrape down sides. Turn mixer to the “stir” setting and add the dry ingredients. Stir until fully incorporated. Add the raisins and mix until combined. Chill for 1 hour.
Preheat oven to 350 degrees (I do all of my baking and cooking with convection). Line two baking sheets with parchment and place spoonfuls of the dough onto the sheets. About 2 Tablespoons each. Bake for 12 minutes, remove from oven, and cool on cookie sheets for 5 minutes. Transfer to cooling racks to cool completely.
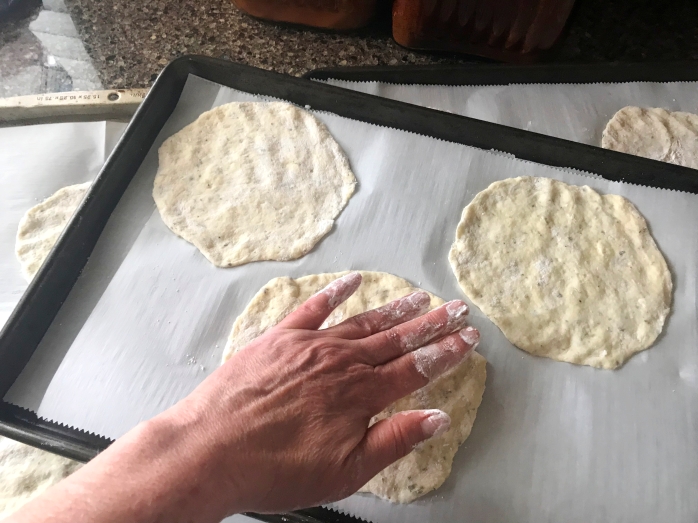
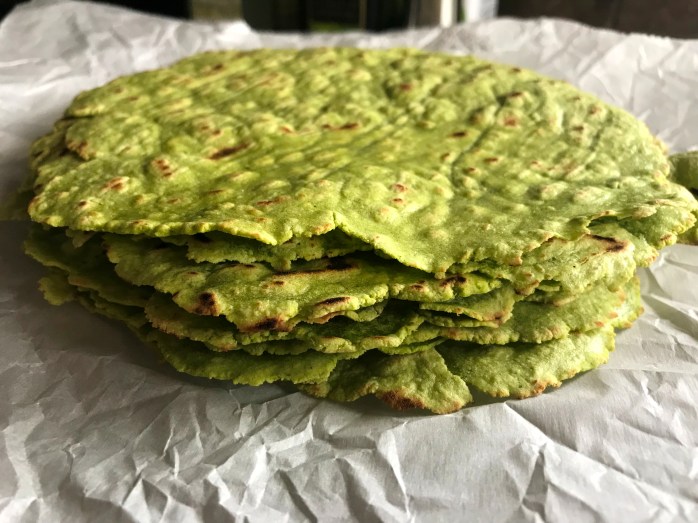
Grain Free Spinach Tortillas
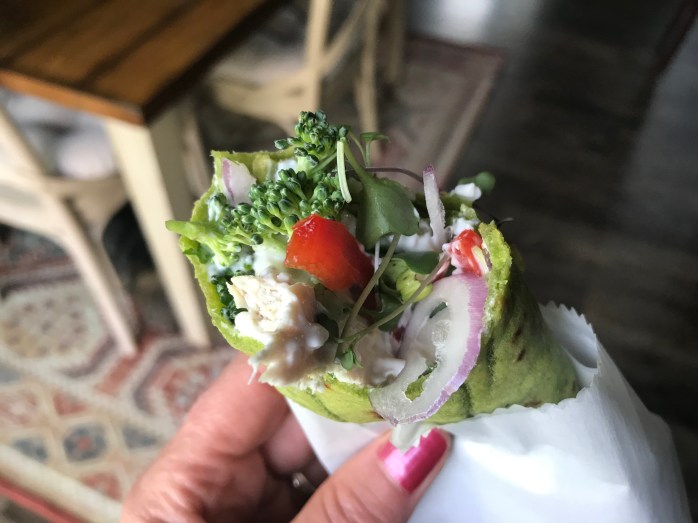

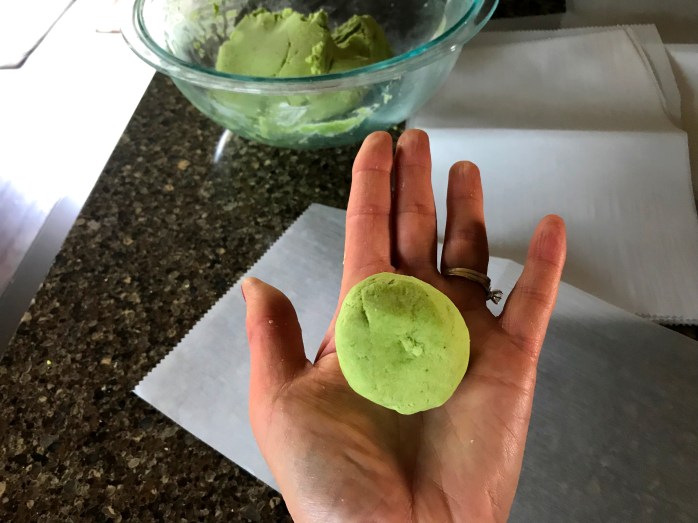
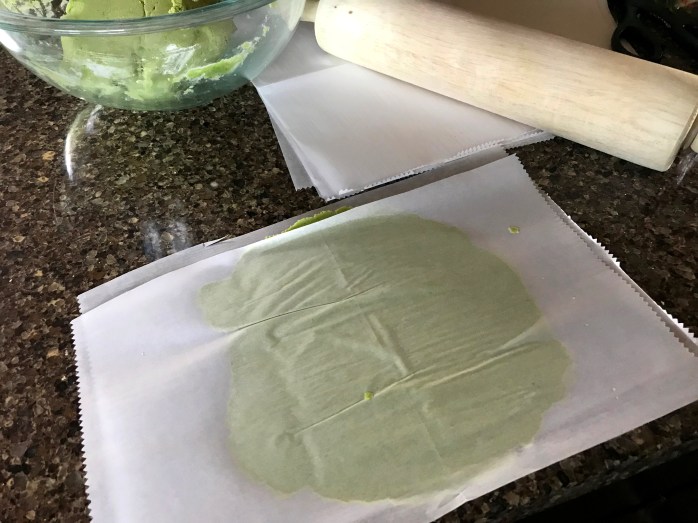
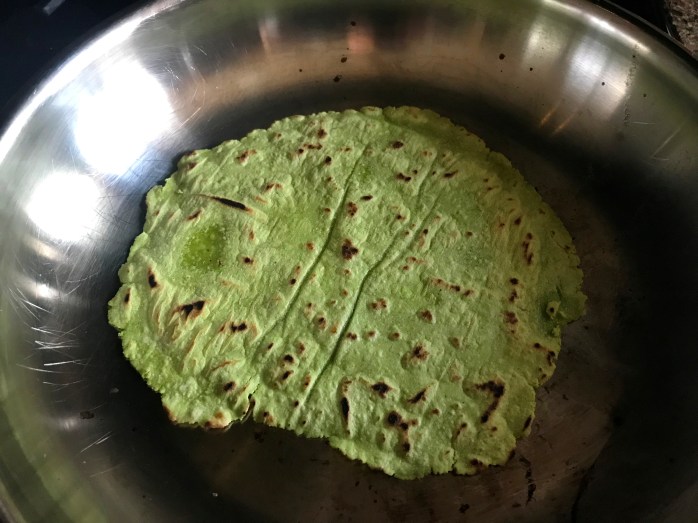

Grain Free & Dairy Free Spinach Tortillas
*Makes about 8 Tortillas
1 1/2 Cups of Otto’s Cassava Flour
1 1/2 Cups of Fresh Baby Spinach Leaves
1/4 Cup of Water
1/2 teaspoon of Sea Salt
5 Tablespoons of Extra Virgin Olive Oil
1/2 Cup of Water
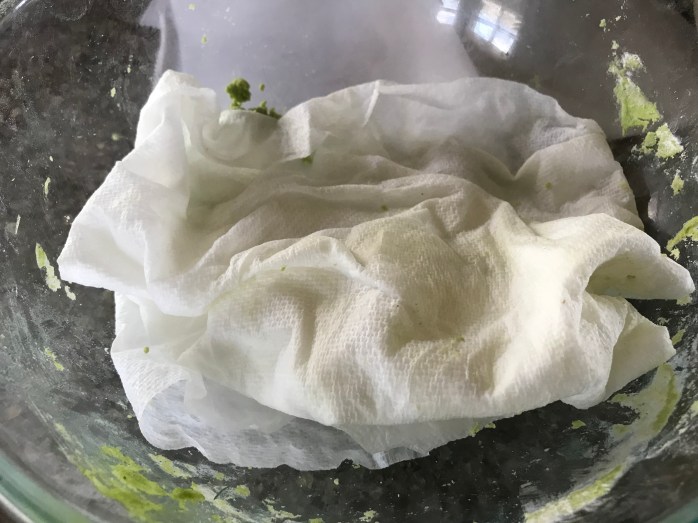
Puree the baby spinach and 1/4 Cup of water in a blender or NutriBullet. Whisk the sea salt and flour together and add the pureed spinach, olive oil, and 1/2 cup of water. Knead until completely smooth. Cover with a damp paper towel and set aside.
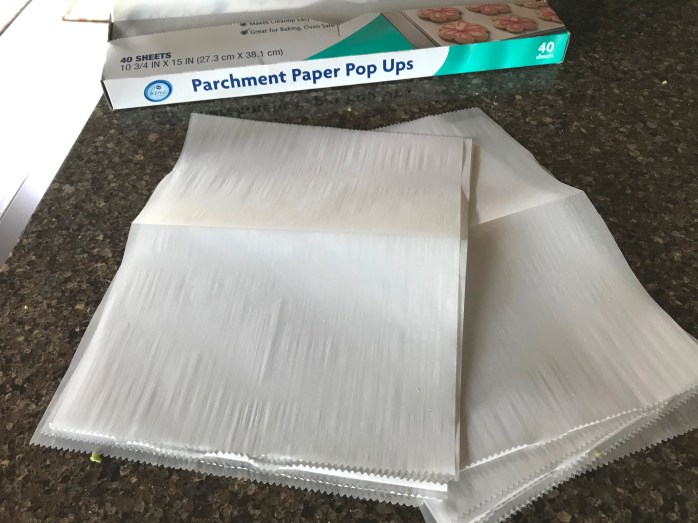
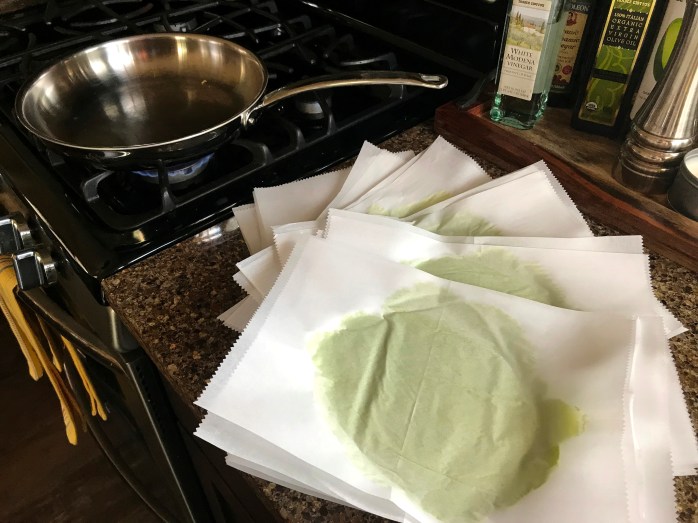
Cut 16 pieces of parchment paper (for rolling the tortillas). Split the dough into 8 somewhat equal pieces, form into balls, and place in the middle of a sheet of parchment. Press down the dough ball with your palm to form a flattened circle then cover the top with another piece of parchment and roll out into a thin circle. Continue with the remaining dough.
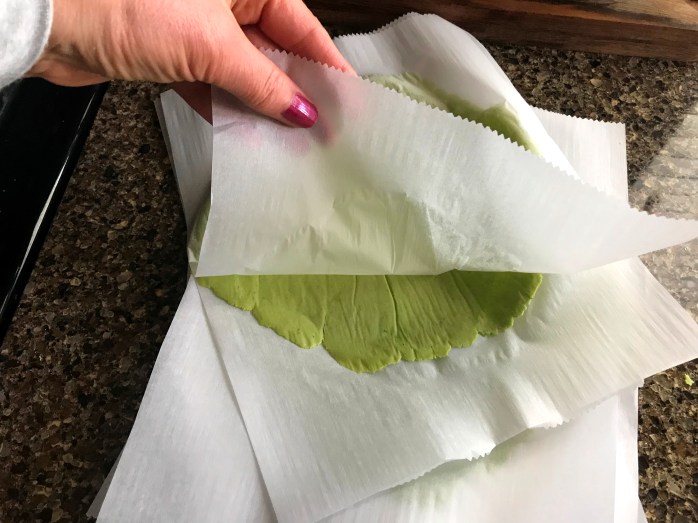
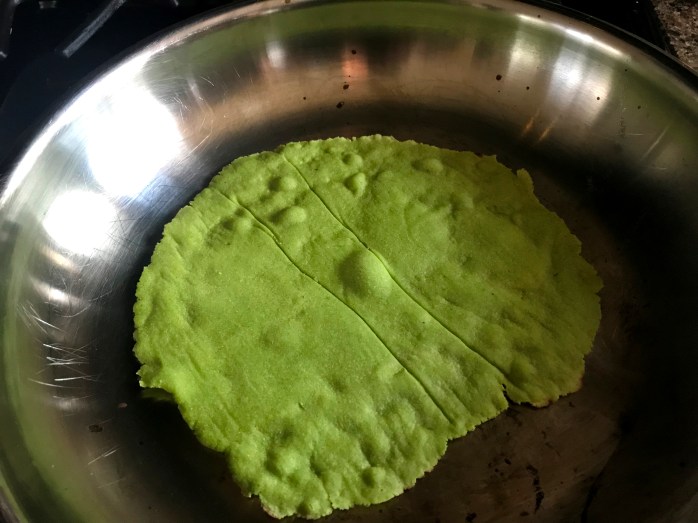
Heat a medium stainless steel or cast iron skillet on medium high (no oil). Hold the tortilla (in its paper) on your hand and flip it over. Loosen the bottom sheet first then flip back over and carefully remove the top parchment sheet (if you rub it lightly all over with your hand, it will peel off more easily). Holding the tortilla with the bottom parchment sheet, flip it into the hot pan. When it begins to bubble, life the edge and check to see if it is slightly browned on the underside. It should also slide pretty easily in the hot pan when it is ready to flip. **DO NOT use a plastic spatula to flip the tortillas because it will melt and leave streaks of plastic in your pan. Use a flat wooden spatula or you can also slide a butter knife under the tortilla and hold the top with your other hand to flip it.
Remove the cooked tortillas to a cooling rack to cool or tortilla holder if you’re serving them immediately and repeat the process with the remaining tortillas.
**For the tortilla in the header picture, I mixed some garlic and herb goat cheese with a little olive oil mayo, and pepper – poached some boneless skinless chicken tenders, and then added micro greens, onion, broccoli, and bell pepper and rolled the tortillas with a folded piece of parchment so they were easy to hold and eat.
Gluten Free Dinner Rolls

These gluten free and dairy free rolls are my all time favorite! Everything about them from texture to taste is perfect thanks to My Gluten Free Kitchen. I’ve been using Michelle’s recipe for several years and it never disappoints! They are delicious with dairy free butter, jam, dipped in soup or stew or gravy, used as a sandwich bun, and I’ve even sliced them and popped them in the toaster for breakfast.


Gluten-Free Pull Apart Dinner Rolls
(One batch recipe makes 9 rolls, if you want to double it you’ll need to also increase the flour by 1/4 – 1/2 cup)
2 3/4 Cups Gluten Free Mama’s Almond Blend Flour
1 1/2 teaspoons of Xanthan Gum
2 teaspoons of SAF Instant Yeast
1/4 Cup Sugar (I have also used coconut sugar but it darkens the color of the rolls)
1 1/2 teaspoon of Salt (I use sea salt & add 1/2 teaspoon to her original 1 teaspoon)
1 Cup of Warm Water
2 Tablespoons of Dairy Free Butter (I use Earth Balance Soy Free)
1 Egg
1 teaspoon of Apple Cider Vinegar
In the mixing bowl of your electric mixer, mix together flour, xanthan gum, instant yeast, sugar, and salt. With mixer running on low speed, add in the water, melted butter (or substitute), egg, and cider vinegar. Mix on medium speed 3 minutes. The batter will be very soft.
Spray 8″ or 9″ round cake pan or pie plate with cooking spray. Using a 2″ scoop or 1/3 cup measuring cup, scoop dough into 9 mounds in the pan. I place one mound in middle, then scoop 8 mounds of dough side by side all the way around the pan.
Dip your fingertips into warm water and use to smooth out the tops of the rolls, continuing to wet fingers as needed. Cover with a dry towel (I spray a sheet of plastic wrap and lay that lightly over the rolls with a towel on top) and let rise in a warm place 45 minutes to 1 hour.
During the last few minutes that the rolls are rising, preheat oven to 400°. Bake in 400° oven for 26-28 minutes. Tops should be golden brown and if you measure temperature of dough, it should measure 200°. Brush rolls with additional 1/2-1 Tablespoon of melted butter (I omit this step).
Twice Baked Potato Casserole
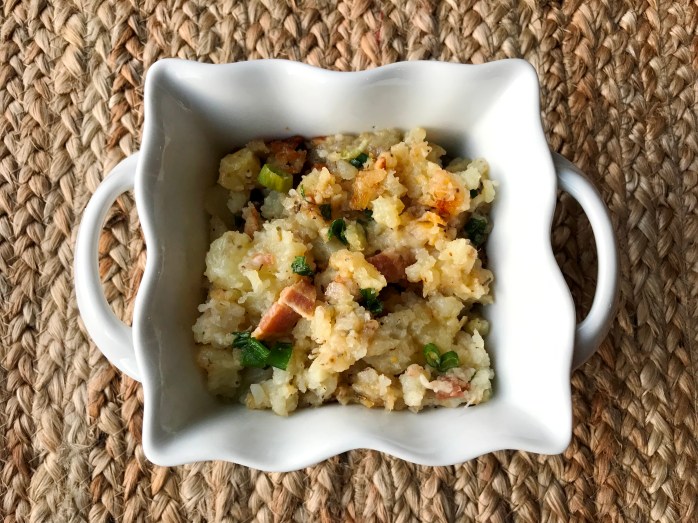
Twice Baked Potato Casserole
10 Large Russet Potatoes Washed and Wrapped in Foil, baked
About 3/4 Cup Dairy Free Milk, heated (I used diluted full fat coconut milk)
3 Tablespoons of Dairy Free Butter
3 Cloves of Garlic, minced or grated
3 Tablespoons of Mixed Herbs (I used oregano, rosemary, and a little thyme)
3 Heaping Cups of Cheese (I used goat cheddar, goat gouda, and Daiya Cheddar Style Cheese)
5 Tablespoons of Dairy Free Butter
Sea Salt & Ground Pepper to taste
6 Slices of Crispy Bacon
1/2 Cup of Green Onions, sliced
Bake and cool the potatoes. Scoop potato meat out of skins into a large bowl. Add the heated coconut milk and 3 Tablespoons of butter and lightly mash the potatoes.
Spray a 13×9 inch casserole dish and set aside. Preheat oven to 350 degrees.
Fold in the 3 heaping cups of cheese, the garlic and herbs, and season generously with sea salt and ground pepper. Dollop the top with the 5 Tablespoons of butter. Transfer to the casserole dish and bake uncovered for 40-45 minutes. While the casserole is baking, slice the onions and fry the crispy bacon (or you could prepare the bacon the day ahead like I did).
Remove the casserole from the oven and top with the onions and bacon.