gluten free zen
Taking The Stress Out Of Gluten-Free Grain-Free & Dairy-Free Living
Fruit & Nut Tea Cookies

Fruit & Nut Tea Cookies
*This recipe was inspired by a recipe in a book I just finished. The “Sugar Cookie Murder” by Joanne Fluke. The story itself was OK. The interesting thing about the book was that half of its pages were filled with recipes, which most of her series are. A fun addition to the typical murder mystery.

These cookies need to be chilled before baking, so no need to pre-heat the oven until you’re ready to bake them.
1 Cup Dairy Free Butter (I use Earth Balance Soy Free)
2 Cups Dark Brown Sugar, packed
2 Eggs
2 teaspoons Baking Powder
1 teaspoon Xanthan Gum
1 1/2 teaspoons Pure Almond Extract
1 Cup Dried Cherries, diced
1/2 Cup Slivered Almonds, roughly chopped
3 1/2 Cups Gluten Free Flour (I use Mama’s All Purpose Almond Flour)
Cream butter and sugar in mixer until very light and fluffy. Beat in eggs one at a time. Add almond extract and mix to thoroughly combine.
In a medium bowl add the flour, baking powder, and xanthan gum. Whisk to combine. With the mixer on low, add the flour mixture slowly until thoroughly combined. Add Cherries and almonds, mix to combine.
Split dough in half into logs on two pieces of plastic wrap. Roll up, cover with foil and freeze or chill for at least three hours. I like to keep cookie logs in my freezer, if wrapped properly they will last at least a month or two. Then, if you have company stop by or just feel like a couple of cookies, you can cut off the amount needed and then return the roll to the freezer for next time.


When you’re ready to bake them, preheat the oven to 350° Remove a roll from the fridge or freezer and slice into thin discs. Place on a parchment lined baking sheet and bake for about 8 minutes. They brown on the bottoms quickly, so you don’t want to over bake them.


Unbelievably Easy Shepherd’s Pie

Unbelievably Easy Shepherd’s Pie
About 1 lb. of High Quality Ground Beef
1 Small Bag Frozen Vegetables (about 2 Cups)
1 1/2 Tablespoons Fresh Oregano (you can use whatever herbs you like, this is what I had fresh on hand)
1 Small Onion, diced
3 Cloves of Garlic, peeled and diced
1 Box Beef Broth (make sure it’s gluten-free, I use Pacific Organic Beef Broth)
1 Tablespoon Dairy Free Butter
Potato Starch or Corn Starch
Betty Crocker Potato Buds (follow directions for serving size for about 8, I also used dairy free butter and almond milk )
Sea Salt & Pepper
Olive Oil
Diced Green Onions
*Individual Oversized Ramekins or an 8 1/2 x 11 Baking Dish
Line a baking sheet with tin foil and set aside. Preheat oven to 425°.
Drizzle olive oil in a large skillet and heat on medium to medium high heat. Saute the onions and garlic for about 5 minutes. Add the beef and oregano and cook until done, season generously with sea salt and pepper (I also added a little garlic powder). Add the frozen vegetables and toss until heated through. Fill 4 oversized ramekins 3/4 full, set aside.
Next, add the butter to the same skillet and melt. Add the box of beef broth and bring to a boil. In a small glass add about 2 Tablespoons potato starch or corn starch (I prefer potato). Fill the glass with enough water or beef broth (I had another box) to cover the corn starch and stir with a fork until completely combined. Turn the broth down to a low boil and slowly whisk the potato starch mixture in. It will thicken pretty quickly so you’ll be able to see within about a minute or two if you want to add more or not. Pour a couple of large spoonfuls over each meat filled ramekin and set aside.
Make the potatoes according to the instructions on the box. I use water, dairy free butter, and sea salt in the pan. Then when the potato flakes are stirred in I add warmed almond milk to think them out to a mashed potato consistency. It’s really a no-brainer and so easy. Sometimes you might need to add more potato flakes and sometimes you might need to add more warmed milk.
Place the ramekins on the covered baking sheet and top with the potatoes. Place in a preheated oven for about 25 minutes until it is bubbling and the potatoes are beginning to brown. They are hotter than heck when you take them out of the oven, so be careful!! Sprinkle with the diced green onions.


Fall Chicken Salad with Clementine & Pomegranate

Fall Salad
1/2 Chicken Breast, cubed
1 Big Handful Fresh Spinach Leaves
1/4 Honey Crisp Apple, cut into bite size chunks
1 Clementine, peeled and sectioned
About 2 Tablespoons Fresh Parsley, chopped
About 1 1/2 Tablespoons Pecan, broken up
About 2 Tablespoons Pomegranate Seeds
1 Tablespoon Olive Oil Mayo (for the dressing)
Juice of 1 Clementine (for the dressing)
Ground Pepper (for the dressing)

A Mexican Party Feast
Starters:
Coconut Shrimp
Stuffed Jalapenos
Tortilla Chips with Homemade Pico & Guacamole
Main Dishes:
Steak, Chicken, and Shrimp Fajitas
Chicken Tamales with Pablano Peppers & Sun Dried Tomatoes
Beef Enchiladas
Side Dishes:
Corn Souffle
Mexican Sweet Potato Hash
Cocktails:
Lime Margaritas On The Rocks
Wine
Sparkling Cider
Desserts:
Coconut Cake
Lime Tart
Mexican Wedding Cookies
Coconut Shrimp
This recipe was adapted from The Complete Mexican, South American & Caribbean Cookbook. No pictures of these, sorry! I prepared the dredging ingredients and put the shrimp in the marinade about an hour prior to the party, put the oil in the pan, and set aside a plate covered with paper towels for draining. Began dredging and frying about 10 minutes prior to the time I wanted to set out the rest of the food.
About 20 Jumbo Shrimp (make sure you use jumbo, I could only find the medium so had to settle with that, and make your life easier by either having them cleaned and deveined at the seafood counter or buying them that way.)
3 Garlic Cloves, crushed and diced (I use organic jarred garlic that is already minced…so easy!)
2 Tablespoons Fresh Lemon Juice
About 1 1/2 Cups Dry Shredded Unsweetened Coconut
1 Cup Fresh Chives, minced
About 1/2 Cup Almond Milk
2 Eggs, lightly beaten with fork
Sea Salt & Freshly ground pepper (which I forgot, but they tasted great anyway!)
Oil for “Deep Frying” (I used canola in a large skillet, about an inch and a half of oil)
Lemon wedges and Italian parsley for garnish.
Mix garlic and lemon juice with a little sea salt and pepper in a medium bowl. Add the shrimp, toss to coat, and marinate for about 1 hour.
Meanwhile, place the coconut on a plate, dice the chives and mix them with coconut. Crack the eggs into a cereal sized bowl and whisk with a fork, set aside. Pour the milk into another cereal sized bowl, set aside.
When shrimp has marinated for 1 hour, heat the oil. I didn’t test the temperature, I heated it on medium-high. When the oil is ready, dip the shrimp in the milk, then the egg, then the coconut and chives. I dipped several and set them aside before putting them into the oil, so I could do several at a time and they would cook evenly. Don’t crowd the pan though, it will lower the oil temp and they won’t cook well and will absorb too much oil.
Flip when they are golden on one side, then remove when they are evenly golden. This only takes a couple of minutes. Don’t overcook them! Overcooked shrimp is rubbery and very unappetizing. Remove to paper towels to drain and then place on platter with lemon wedges and garnish with Italian parsley.
Grilled Stuffed Jalapenos

I made two versions of these. One dairy free and one with dairy. I had never made a dairy-free version and I have to admit, I was shocked at how delicious they were! So good. So good in fact that I can’t wait to make them again for the next gathering we have. For this dish, I made the cheese stuffing and cleaned the peppers two days ahead. One day ahead I stuffed all of the peppers, and then about a half hour prior to the beginning of the party I put them on the grill. I covered half of the grill with tin foil so as they were done I slid them over to the foil to stay warm. Then, turned the grill off, allowed them to sit while I did the shrimp, then removed them to a platter to serve.
About 30 Large Jalapenos
1 Cube of Goat’s Milk Cheese (7 oz.)
1 Small Tub of Dairy Free Cream Cheese
1/2 Cup of Dairy Free Cheddar Cheese (Daiya), heaping
About 2 Heaping Tablespoons of Fresh Cilantro, chopped
About 3 Green Onions, diced
1 Heaping teaspoon garlic, finely chopped
A Couple Grinds of Sea Salt & A Few Grinds of Pepper
Rinse and dry the peppers. Slice just the top quarter off of the pepper with a sharp knife and set aside. I used the tops in some of the other recipes I made. If you have leftovers, which I did, you can freeze them fresh or even grill them and freeze them for future recipes.
A lot of people wear gloves when dealing with hot peppers. I didn’t, and I was fine. But…you’re taking a chance of having burning hands even if you wash them repeatedly and if you forget and touch your eyes, you won’t be a happy camper…for hours. It kind of depends on how sensitive you are to the oil. I was also careful to let the knife and spoon do the work and avoided the urge to grab anything with my fingers.
Using a small spoon (I used an iced tea spoon) and paring knife, cut out the membrane and scoop out the seeds.

In a medium bowl, combine the goat’s cheese, dairy free cream cheese, dairy free cheddar, cilantro, green onions, garlic, and salt and pepper.
Stuff each pepper generously and refrigerate for at least an hour. Because I stuffed mine a day ahead, I removed them and allowed them to come to room temperature (about an hour) before grilling.

When you’re ready to grill them, set the grill to medium high. Place peppers carefully on grill and cook until they are sizzling, slightly charred on the bottom and the cheese is melted.
Incredibly good and had I not said anything, no one would have ever known they were dairy free!
Homemade Pico De Gallo & Guacamole
I didn’t get a picture of the guacamole but I’ve made it before, you can see what it looks like here. I made the pico the night before the dinner party and the guacamole the morning of. It’s fine to make it ahead of time, but when you cover it to refrigerate, make sure you put the plastic wrap on it so it is touching and covering the entire top surface of the guacamole. This keeps the air out and stops it from browning.
Guacamole:
The amounts very for this recipe depending on how many people will be eating it and whether its a snack party or you’re using it for an hors d’ oeuvre. This recipe made about two full cups.
4 Ripe Avocados
About 1/4 Cup White Onion, diced
About 1/2 Cup Cilantro, roughly chopped
About 5 Sun Dried Tomatoes, diced
2 Jalapenos, diced
1 Heaping teaspoon Minced Garlic
Juice of 2 Large Limes
Sea Salt & Pepper To Taste
Slice avocados in half, remove pits, and place flesh in a large bowl. Smash the avocados with a potato masher until smooth. I like mine smooth with small chunks. Add the onion, sun dried tomatoes, jalapeno, and lime juice. Stir to combine. Season to taste, and refrigerate for at least two hours.
Pico De Gallo:
The amounts in this recipe vary as well. Make it to suit your needs. This recipe made about 4 full cups.
About 4-5 Medium Vine Tomatoes
About 1 Medium Onion
About 3/4 Cup Cilantro, roughly chopped
About 1 teaspoon Garlic, minced
About 2 Jalapenos, minced
Juice of 3 Limes
Sea Salt & Pepper To Taste
Stir to combine and refrigerate.

Steak, Chicken, & Shrimp Fajitas
This picture doesn’t really do them justice. Trying to take pictures during a party is crazy and then figuring out the lighting and the settings on my camera…. The night before the party I sauteed the chicken, steak, peppers, and onions until the meat was cooked but rare. I refrigerated it over night and then right before the party started, I placed them back in the frying pan on medium high heat to heat through and then added the shrimp to cook.

1 Medium Steak (use a really good cut of meat), sliced thinly
2 Chicken Breasts, sliced thinly
About 20 shrimp, peeled and deveined
(The steak and chicken are much easier to slice thinly if they are partially frozen.)
1 Medium Onion, sliced
3 Bell Peppers, sliced (I used orange and yellow)
Garlic
Cumin
Olive Oil
Drizzle olive oil in large skillet. Add the chicken and steak slices, season with garlic and cumin. Saute. When the meat is rare, add the onions and peppers. When the onions are beginning to turn translucent add the shrimp and toss until done. Don’t overcook the shrimp, they become rubbery.
Serve with tortillas, shredded cheese, sour cream, guacamole, and salsa. I served mine with flour tortillas for the gluten eaters and teff tortillas for the gluten free eaters.
Chicken Tamales with Pablano Peppers & Sun Dried Tomatoes

You can make these at any time and freeze them until you need them. They freeze very well and only need to be thawed and then steamed to serve. I did mine about three days prior to the party. Making tamales is kind of a laborious process so you certainly don’t want to wait until the day you need them. I ran across a recipe on the internet for chicken tamales where the woman used a rotisserie chicken from the grocery store. It saved me about an hour and a half and a lot of work and mess.
This recipe makes about 25 medium sized tamales.
1 Bag Dried Corn Husks (find them in the Mexican food isle in the grocery store)
1 Rotisserie Chicken, skinned, meat removed and shredded
3 Pablano Peppers, grilled until lightly charred and sliced thinly
1 Small Jar Sun Dried Tomatoes, chopped (I used the Mezzetta 8oz. jar)
4 Cups Masa Mix (find it in the Mexican food isle in the grocery store)
1 Tablespoon Baking Powder
2 teaspoons Sea Salt
About 4 Cups Chicken Broth, warmed
1 Cup Vegetable Shortening (or lard, if you want to get really traditional)
1 Tablespoon Chili Powder
1 Tablespoon Cumin
1 Tablespoon Garlic Powder
Separate the corn husks carefully and place them in a big roasting or stock pot. Cover with boiling water and allow to sit while you’re getting all of the other ingredients ready. Place a plate or dish on top of them if they keep floating to the top.


Rinse and dry the pablano peppers and place them on a grill at medium-high heat until blistered and slightly charred. You can also place them on a baking sheet and put them under a broiler. When they are blistered and slightly charred, remove them from the oven and place them in a zip lock bag. Usually, this helps to steam them so you can remove the skin, but I like to keep it on and the steaming keeps them moist and supple while they’re cooling.
Meanwhile, shred the chicken and chop the sun dried tomatoes. Place each on a large cutting board or on separate plates creating an assembly line.


Next, make the masa mix using the directions on the bag. I also added the chili powder, cumin, and garlic. Place all of the dry ingredients in a bowl and whisk.
Stir the shortening with a whisk or wooden spoon to fluff.
Using one hand to mix, slowly add the warmed chicken broth a little at a time until the masa is a smooth, but thick consistency.
Add the shortening and stir until thoroughly combined.

Lay a couple of paper towels out on the counter. Spread a corn husk out with the rough ridged side on the outside. Follow the picture steps below. Place a heaping Tablespoon of masa on the husk and spread.


Place a steamer in the bottom of a large stock pot, fill with water but just to below the rim of the steamer. Fill the pot with the tamales open side up, cover and steam on medium low for an hour and a half. You will need to keep an eye on the water in the pot and refill as necessary. Be careful not to get the water into the top of the tamales.


Once cooled, they can be frozen and then re-heated after thawing.

Beef Enchilada Casserole

This was assembled about an hour and a half before I wanted to serve it. It needs to bake for about 45 minutes or so, depending on what else is sharing the oven. Then, allow to rest and set up for 10 minutes before cutting. You can find the recipe here.
Corn Souffle

I removed this souffle from the oven about 1/2 hour before I put the enchiladas in. But I roasted the squash and sweet potatoes the day before and then set aside in the refrigerator. This is another adapted recipe from The Complete Mexican, South American, and Carribbean Cookbook. It is an impressive dish, light and delicious! Mexican souffles don’t puff way up like most but it is still light and airy. Think I’ll make it again for Thanksgiving or Christmas!
About 8 Tablespoons Dairy Free Butter
About 2 Cups Cubed Sweet Potato, peeled & roasted
About 2 Cups Blue Hubbard Squash, peeled & roasted
4 Cups Corn Kernals, fresh or frozen (if you use frozen, thaw)
6 Green Onions, chopped
About 10 ounces Dairy Free Cheese
8 Eggs
Sea Salt & Pepper
Preheat Oven to 350°
Peel and cube the sweet potato and squash, and roast until tender. Using 1 Tablespoon of the butter, grease a 9 1/2 x 11 baking dish. Put 3 Cups of the corn into a food processor, add the green onions and process until mostly smooth.
Put the remaining butter in a large pan, add the corn and onion mixture and cook on medium low until heated through. Add the sweet potato and squash, cook until heated through, stir in remaining corn.
Add the cheese, stirring until it melts almost all the way. Season generously with sea salt and pepper. Remove from heat.
Separate 5 eggs. Then add the 3 remaining whole eggs to the egg yolk bow. Stir the egg yolk bowl with a fork until the eggs are combined and fold into the warm corn mixture.
Whisk the egg whites with a pinch of salt to stiff peak. Fold into the souffle mixture. Pour the mixture into the prepared baking dish and place the dish in a large roasting pan. Place the pan into the oven and fill the roasting pan with boiling water to come halfway up the souffle dish.
Bake for 35-40 minutes or until the souffle no longer jiggles when shaken gently. A little jiggle is OK. I think I had to cook mine for about 4o to 45 minutes.
Remove from oven and set aside to cool.

Sweet Potato Hash with Kale & Chorizo

The original recipe for Sweet Potato Hash comes from EatandRelish.com with her help and advice, I adapted it to fit a Mexican dinner theme. I roasted the sweet potatoes and jalapenos the day before and then refrigerated until I was ready to saute everything.
8 Cups Sweet Potato, peeled & roasted
2 1/2 Tablespoons Jalapeno, diced and roasted with the sweet potato
2 Cups Spanish Chorizo, chopped
About 2 Cups Lacinato Kale, roughly chopped
3 Cloves of Garlic, minced
Olive Oil
Sea Salt & Pepper To Taste
Peel and cube the sweet potato. Dice the jalapeno, drizzle the sweet potato and jalapeno with olive oil and roast both in a 425 degree oven until the sweet potato is tender. In a large saute pan add the chopped chorizo and garlic. Saute until the chorizo starts to release its oil and the garlic is cooked. Do not drain the oil. Add the sweet potato and jalapeno mixture. Toss until heated through and combined. Add the kale and toss until wilted. Serve warm.
Coconut Cake with Raspberry Filling

This cake is gorgeous and delicious and VERY easy. I made it the day before the party. Forgot to get a picture of an actual slice, it was very pretty with the raspberry in the middle.
2 Boxes Betty Crocker Gluten Free Yellow Cake Mix
Eggs
Water
Dairy Free Butter
1 teaspoon Pure Vanilla Extract
1 teaspoon Coconut Extract
100% Fruit
Raspberry Jelly
Powdered Sugar
Almond Milk
Shredded Sweetened Coconut
Prepare and bake the cake mix according to the directions and add 1 teaspoon each vanilla and coconut extract. Set aside to cool. Spread a thin layer of raspberry jelly between on the bottom cake layer. Pour about 4 1/2 Cups Powdered sugar into an electric mixer. Add about 1/2 cup butter, 3 teaspoons coconut extract, and 1 teaspoon vanilla. Mix until thoroughly combined, adding almond milk a small amount at at a time until the frosting resembles a smooth and fluffy consistency.
Frost the cake and press the coconut over the frosting. Cover and place somewhere cool until ready to serve.
Lime Tart

This is very similar to the lemon tart I made a month or so ago. You can find the recipe here. I used limes instead of lemons, of course and didn’t add the figs. It’s very “tart” and limey, an absolutely perfect ending to a spicy Mexican meal. I made it the day before the party and refrigerated it.
Mexican Wedding Cookies

Otherwise known as Pecan Sandies, these cookies are light and go well with a variety of meals. Instead of forming them into traditional balls, I rolled the dough and used a leaf cookie cutter, then sprinkled with powdered sugar. I made these two days prior to the party and stored in a tupperware container. This recipe is adapted from the Better Homes & Gardens New Cookbook 1989.
1 1/2 Cups Dairy Free Butter
4 1/2 Cups Mama’s Almond All Purpose Gluten Free Flour
2/3 Cups Sugar
2 teaspoons Pure Vanilla Extract
2 Cups Pecans, finely chopped
1 teaspoon Xanthan Gum
1 1/2 Cups Powdered Sugar
Preheat oven to 325°. In an electric mixer add the dairy free butter and sugar. Beat until thoroughly combined and fluffy, scraping down once. Add about half of the flour and the vanilla, beat until thoroughly combined. Add the remaining flour, xanthan gum, and pecans. Mix until thoroughly combined. Split dough into three discs. Using a little extra flour, roll dough out and cut with leaf shaped cutter. Place on parchment lined baking sheet and bake for about 10 minutes. Remove to wire cooling rack and using a small mesh strainer, sprinkle with powdered sugar. Store in an airtight container.


Pumpkin Pancakes with Apple Maple Compote
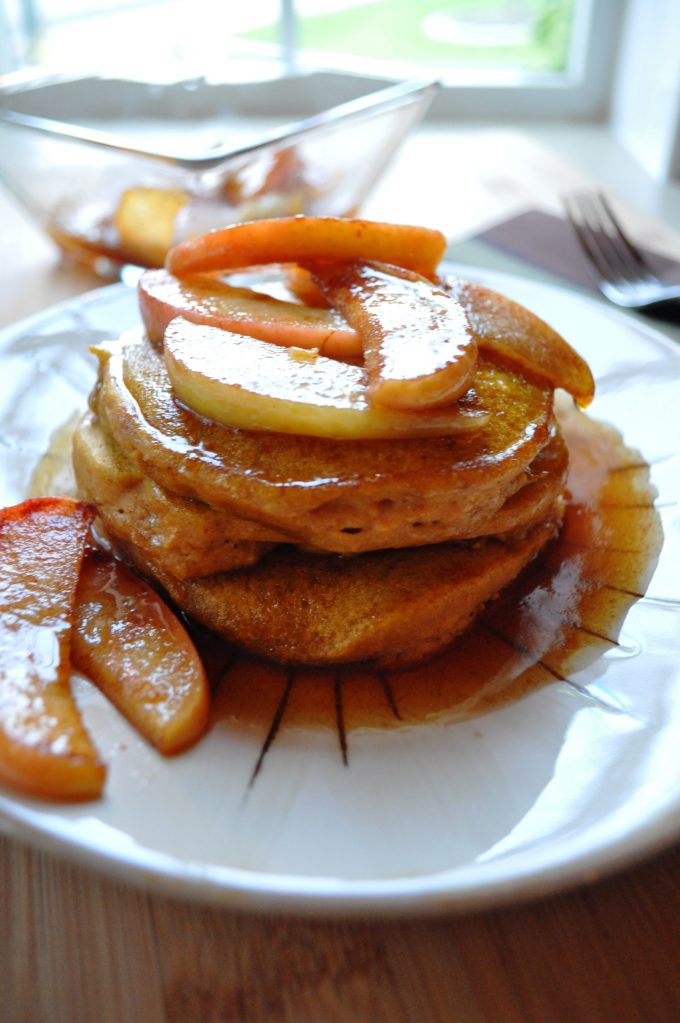
Pumpkin Pancakes with Apple Maple Compote
1 Cup Mama’s Almond All Purpose Flour
1 Cup White Rice Flour
1 teaspoon Baking Powder
1/2 teaspoon Baking Soda
1/3 Cup Granulated Sugar
1/2 teaspoon Sea Salt
1 Tablespoon Pumpkin Pie Spice
1/2 teaspoon Xanthan Gum
1 1/2 Cups “Buttermilk” (Almond or coconut milk with 1 Tbs. lemon juice, let sit 10 minutes)
1 Cup Pumpkin Puree
2 Large Eggs, lightly beaten
2 Tablespoons Dairy Free Butter, melted
Combine flours, baking powder, baking soda, sugar, sea salt, pumpkin pie spice, and xanthan gum in a medium bowl with a whisk. Add the buttermilk, pumpkin puree, eggs, and melted butter. Stir just until combined.
Cook as you would a “regular” pancake and top with the apple compote below.
Apple Maple Compote
I recommend using 1/2 apple per person. This is very easy and leftovers would also be delicious over a bowl of oatmeal.
Apples (I used Honey Crisp)
Dairy Free Butter
Cinnamon
Real Maple Syrup
Place the butter in a hot skillet, slice the apples on top, add a generous sprinkle of cinnamon.
Saute the apples in the butter and cinnamon until aldente, add enough syrup to cover the apples and allow to bubble for a few minutes. Pour over warm pancakes.

Baked Pumpkin Oatmeal with Pumpkin Spiced Almond Milk

Baked Pumpkin Oatmeal with Pumpkin Spiced Almond Milk
• For The Spiced Almond Milk:
1/4 Cup Almond Milk
1/2 teaspoon Pumpkin Pie Spice
Add the almond milk and spices to a small sauce pan and heat until hot being careful not to scorch it. Set aside and cool (I poured mine in a bowl and set it in the freezer for a quick cool.)
• For The Pumpkin Oatmeal:
Preheat oven to 350 degrees for conventional 325 degrees for convection
1/3 Cup Gluten Free Old Fashioned Rolled Oats (I use Bob’s Red Mill)
2 1/2 teaspoons Dark Brown Sugar, packed
1/2 teaspoon Pumpkin Pie Spice (or a combination of cinnamon, nutmeg, ginger, and cloves)
1/4 teaspoon Baking Powder
1/8 teaspoon Sea Salt
1 Tablespoon Dairy Free Butter
1/4 Cup Almond Milk
1 Egg
1 Tablespoon Canned Plain Pumpkin
1 teaspoon Vanilla
1 Tablespoon Chopped Pecans, toasted
In a small bowl add the oats, brown sugar, pumpkin pie spice, baking powder, and sea salt. Whisk until thoroughly combined. Add the butter and crumble through with your fingers until combined but still chunky.
In a glass measuring cup add the almond milk, egg, pumpkin, and vanilla and whisk with a fork until thoroughly combined.
Spray a single serving baking dish or two small ramekins (about 6 oz each or so) with non-stick spray. Add the liquids to the oat mixture and stir until combined.
Pour into the baking dish or ramekins, place on a baking sheet, and bake for about 15-16 minutes. You want the top to still jiggle slightly when you remove it from the oven. While the oatmeal is baking, chop and toast the pecans in a small saute pan over medium high heat tossing frequently until they are slightly browned and they begin to smell warm and nutty. Set aside.
When the oatmeal is done, sprinkle with the pecans and dip your spoon into it in several different places to open it up. Pour the spiced almond milk over the top.

Roasted Pumpkin Seeds – Two Ways

Rinse the pumpkin seeds well. Spread out on paper towels and allow to completely dry. I left mine to dry for two days, but only because I didn’t have time to get to them. I’m sure they would be plenty dry if you just left them overnight.
For Sweet & Spicy Pumpkin Seeds:
1/2 of your seeds
about 1/2 Tablespoon of olive oil
a generous amount of cayenne pepper
a generous amount of chili powder
a generous amount of chipotle chili powder
a generous amount of ground sea salt
about 1 1/2 Tablespoons of sugar
When I say generous amount, what I mean is, add as much as you think you might like and then multiply it by two. It sounds like a lot, but it’s not. Toss all of the ingredients together with a wooden spoon until they are completely combined and all of the seeds are coated. Spread the seeds out on the parchment lined baking sheet and roast for about 25 minutes or until the seeds are lightly browned and crisp, tossing a couple of times in between with a spatula.

For Garlic & Sea Salt Roasted Pumpkin Seeds:
1/2 of your seeds
about 1/2 Tablespoon of olive oil
about 1 heaping teaspoon of minced garlic, preferably the kind in the jar
a generous amount of ground sea salt
Again, when I say generous amount, what I mean is, add as much as you think you might like and then multiply it by two. It sounds like a lot, but it’s not. Toss all of the ingredients together with a wooden spoon until they are completely combined and all of the seeds are coated. Spread the seeds out on the parchment lined baking sheet and roast for about 25 minutes or until the seeds are lightly browned and crisp, tossing a couple of times in between with a spatula.
Asian Style Rockfish with Tangy Sesame Salad

Tangy Sesame Salad
2 Cups Napa Cabbage, thinly sliced
1 Cup Shredded Carrots
1/2 English Cucumber, peeled, cut down the middle and thinly sliced
1 Green Onion, sliced down the middle and thinly sliced
1 Heaping Tablespoon Cilantro, chopped
For The Dressing:
1/2 Cup Rice Vinegar
3 to 4 Drops Dark Sesame Oil, about 1/2 teaspoon
1/8 teaspoon Grated Fresh Ginger
1/2 teaspoon Gluten Free Soy Sauce
Prepare the salad ingredients. Prepare the salad dressing. Whisk until fully incorporated.
Place the vegetables in a medium bowl, toss, cover, and refrigerate. Cover and refrigerate the dressing. Don’t dress the salad until the fish is finished cooking or the salad will become limp.
Rockfish In A Pocket – Asian Style
Preheat Oven to 350°
4 Non-Oily Fish Fillets (I used Rockfish)
1/2 of a Large Red Bell Paper, thinly sliced
2 Green Onions, thinly sliced on an angle
1 Clove Garlic, peeled and thinly sliced
1 teaspoon Grated Ginger
1/2 teaspoon Clementine Zest
Olive Oil
White Rice
For The Sauce:
1 Tablespoon Gluten Free Soy Sauce
1 Tablespoon Sweet Chili Sauce
1/2 Tablespoon Rice Vinegar
1/2 teaspoon Sriracha Sauce
Get the rice going first so it can cook while you are preparing the fish. Rinse and pat the fish dry with paper towels. Set aside. Prepare the pepper, onion, garlic, ginger, and clementine zest and set aside. In a small dish, add the soy sauce, sweet chili sauce, rice vinegar, and sriracha sauce.
Line a baking sheet with parchment paper, set aside. Cut 4 pieces of parchment for the fish pockets.
Place two fish fillets in the middle of one piece of parchment. Drizzle with a tiny amount of olive oil and rub it over the fillets. Take 1/2 of the clementine zest and grated ginger and rub into the fillets, dispersing it as evenly as possible. Spread 1/2 of the sliced garlic over the top.
Layer 1/2 of the peppers and onions over the top. Stir the sauce well and drizzle 1/2 of it over the fillets. Place another piece of parchment over the top of the fish, joining the long edges together by folding them over.

Continue rolling the sides and pressing along the edge with your fingernail or the handle of a butter knife until there is a sharp edge and the folded parchment reaches the fish.
Then roll the short edges the same way until it is completely folded and sealed.

Repeat with the remaining fillets. Place both pockets on the parchment lined baking sheet.
Bake for 20-25 minutes. While the fish is baking, toss the salad with the dressing.
Remove the pockets from the oven. Carefully slit open the top and pull apart. Be very careful, the steam from the fish is very hot.
You can eat this two ways. you can place the pocket on a plate and put the rice in it to soak up the juices and eat it that way. Or, you can put rice on your plate, place the fish on top of the rice and then pour the juices over it, which is what I did.
Raspberry & Apricot Pie Dough Pastries

Preheat oven to 325°
*I forgot to count how many cookies this recipe actually made, but I would say that I got at least 35-40 out of it. Minus a few for nibbling while frosting.
2 Portions of Gluten Free Pie Dough (The highlighted link makes 4 individual pie crusts, you will need 2. If you make the pie dough the same day you plan to make the cookies, it will need to chill for at least 2 hours.)
Gluten Free Flour For Rolling
1 Small Jar Each – 100% Fruit Raspberry & Apricot Jelly
About 2 Cups Powdered Sugar
About 1 Tablespoon Dairy Free Butter
About 1 1/2 teaspoons Pure Almond Extract
On floured parchment paper, roll out the first batch of dough. Trim edges so that it resembles a square.

Cut into rows, making smaller squares.

Line a baking sheet with parchment and set aside. In two small bowls place about 3/4 each of the apricot and raspberry jellies. Stir with a spoon to smooth.

Melt the butter. In a medium bowl whisk together the powdered sugar, butter, and almond extract, adding a tiny bit of warm water a little a time until the mixture is of a medium-thick drizzling consistency and all lumps are whisked out. Set aside.
With a lightly floured spatula, transfer each square to the covered baking sheet. Press the squares out lightly with your fingers.

Next, place about a teaspoon or so of jelly in the middle of each square and bring two of the sides together. Slightly overlap the sides, kind of smoothing the dough over the other side. When my first batch came out of the oven, I had a few that popped open because I didn’t make sure the dough was smoothed together.

Some of them will look absolutely perfect and some of them won’t. Don’t fret about it, baking is supposed to be fun and relaxing! Bake them for about 20 minutes. Carefully remove them from the baking sheet onto a wire cooling rack to cool slightly before frosting. Once they have cooled for 5 minutes or so, drizzle with frosting.


Continue with the remaining dough from the first batch and then roll out the second batch and follow the steps above.
Allow them to sit for 15-20 minutes before plating so the frosting has time to set up.

Clementine Tart

Clementine Tart
For The Tart:
1 Cup Mama’s All Purpose Almond Flour
1/4 Cup White Rice Flour
1/3 Cup Granulated Sugar
1/2 teaspoon Xanthan Gum
1 1/2 teaspoons Clementine Zest (about 2 Clementines)
1/4 teaspoon Nutmeg
1/2 teaspoon salt (I used table not sea because I worried that the sea salt was too large)
1 1/2 teaspoons Pure Vanilla Extract
1/2 Cup Dairy Free Butter, cold
In a small bowl add both flours, xanthan gum, and salt. Whisk to combine and set aside. In a mixer, add the butter and sugar, beat for 30 seconds and scrape down the bowl. Add the zest, nutmeg, and vanilla, and beat until thoroughly combined and mixture is fluffy. Add the flour mixture and beat on medium for 30 seconds, scrape down bowl. Then beat for about 1 minute or until the mixture begins to almost pull all the way away from the sides of the bowl.
(You can find step by step pictures here.) Scoop mixture out into a tart pan with removable bottom. Press tart crust dough into the tart pan quickly, you don’t want the butter melting too much because it makes the dough too soft. Trim edges on an angle with a very sharp knife. Cover with plastic wrap and refrigerate for two hours. Remove the refrigerated crust after two hours and poke holes around the pan with a fork. Preheat oven to 325°
Line the tart crust with parchment paper and baking beans (or rice, couldn’t find my baking beans) and bake in a pre-heated oven for 30 minutes. After 30 minutes remove bean/rice and parchment paper and allow to cool while you get the remaining ingredients ready.
For The Filling:
7 ounces Almond Milk (I like to cook with Almond Breeze because it’s thick)
2 teaspoons Dairy Free Butter
3 Eggs plus 2 Egg Whites
1/2 Cup plus 2 Tablespoons Powdered Sugar
Zest of 6 Clementines
Juice of 5 Clementines (about 1/2 cup)
Heat the almond milk and dairy free butter on low in a small saucepan. Once it was hot I kept mine on warm until I finished the remaining ingredients. Next, in a medium bowl, add the eggs and powdered sugar. Whisk until there are no lumps remaining. Add the clementine rind and clementine juice and whisk until thoroughly incorporated. Set aside.
Slowly, drizzle the warm milk and butter mixture into the egg mixture whisking quickly the entire time. Pour 1/2 of the liquid into the tart shell.
Pour the remaining liquid into a measuring cup and place the tart pan in a preheated oven. Do not pull out the shelf, because when you pour the remaining liquid into the tart and then have to push the shelf back in, it will slosh all over the place and your beautiful tart will be in the bottom of your oven. Pour the remaining liquid slowly into the tart pan.
Bake for 20-25 minutes. You want it to have a soft jiggle when you remove it from the oven, similar to jello, but not too much movement. You’ll know if you’ve overcooked it because it will crack and start to pull away from the sides of the tart shell. It’s better to have it slightly under cooked than over cooked.

Refrigerate for at least 2 hours. When you’re ready to serve it, sprinkle with powdered sugar and garnish with thinly sliced clementines.


